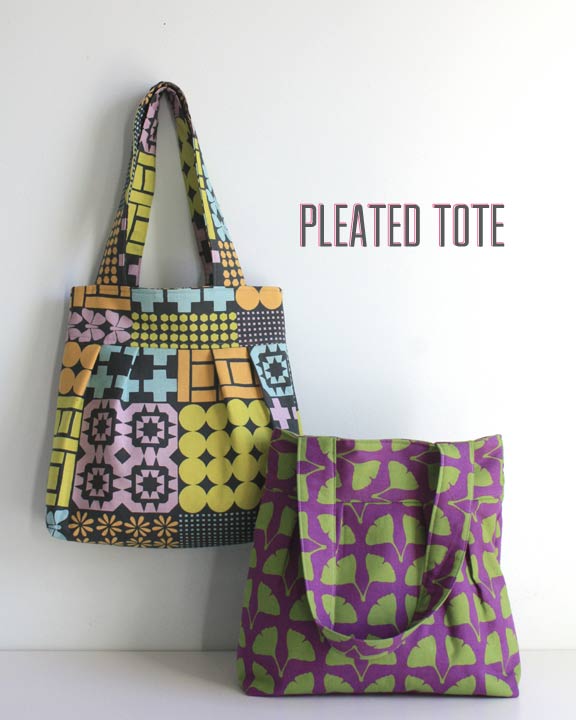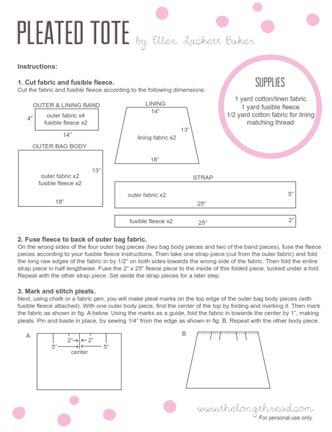
Should I call this a Make it Monday post? Anyone who has read this blog for a long time might remember that I posted tutorials regularly on Mondays. How did I have time to do that? Anyway, here’s the tutorial for the simple pleated tote that I posted about a couple of weeks ago. Just click on the .pdf file below to print the instructions.
Note that the instructions guide you to sew two rows of topstitching on the bag, which I did the first time around, but not on the bags pictured here. So I’ll leave the topstitching decision up to you. Also, the instructions don’t include any pockets or snaps, but feel free to add whatever you’d like. Here I made the bags with my Stamped collection in the pastel on charcoal cheater print and the purple ginkgo leaves. See my previous post for fabric availability.


These are lovely, adding to my ‘to-sew’ list!
You are a dear to post the tutorial. Thank you!
Pretty bag! Thank you for the tutorial…
oh, thank you so much! I think I’ll make myself one for Christmas 🙂
Okay, I’ve officially renamed this “Make Me Look Good Monday”! I was trying to figure out what to make my boss for Christmas and BAM! here it is.
Thanks so much!
Asiyah
So cute Ellen! Perfect holiday gifts.
What beautiful totes! I really like the fabric choices too. Thank you for the post
Ooh! I’ve been waiting impaitently for this tutorial.
A little question: are there measurements for the outer and lining bands? These are missing from the diagrams at the start.
Thank you!
I love these totes – the proportions are perfect. Your new line of fabrics is great as well, the large scale of these prints is fabulous. One question, and I might be being dense, but the pdf. tutorial doesn’t seem to have the measurements for the Outer & Lining Band. Maybe they are there, but I can’t see them. Thanks so much!
You guys are great pattern testers! Just added the dimensions of the band to the instructions. Thanks for catching that!
wheeeeee!!! and yay for having bought some of your lovely fabric this weekend 🙂 Thanks for the tutorial!
Are there dimensions for the outer and lining band?
Thanks for the tutorial. A friend and I are going to sew-a-long via email.
Oh cute! I’ve been hoarding some fabric for the perfect tote. I wanted a pattern that has a splash of fancy and this is just right :). Thanks for sharing.
too cute! Love the fabrics, of course!
Thanks for this great tutorial!
Love the bag!! Thank you so much for this tutorial!!
I’ve been needing a new bag and love this one ~ thanks so much!
I am making these as Christmas gifts! What are the dimensions for the Outer and Lining Bands? The PDF doesn’t show the dimensions. Thank you!
Or….my printer just didn’t print the dimensions! Oops!
I love this! Perfect and easy.
This is really unoriginal of me but I’ve ordered fabric to make THOSE BAGS EXACTLY. (And a quilt from the cheater pattern)
Hi there! Love this bag. Gathered up the supplies and started my first (notice I said first…I found some spring fabric I love, and some summer, and maybe autumn!)
My question: I’m on the part about pleating the outer bag body. I can not, for the life of me, make the band fit WITH the 5 inch (mark) pleats on either side. It fits if I eliminate them and only do the 2 inch (mark) pleats. Am I crazy or does the dimensions not support two 1 inch pleats on either side of center?
The finished pleat is 1/2″, but you will pull the fabric over 1″. Does that make sense?
Loved this pattern! Made several bags for teacher and babysitter Christmas gifts!
A few places where I also had trouble with the tutorial… where it says 1” pleats, I originally made the pleats 1”… which was really 2 inches for each pleat because it was folded over! The trick is to make the pleated top, after it’s folded and sewn at the top, equal 14”. So the pleats are evenly spaced and taking it from 18” to 14”. This means each of the 4 pleats is 1/2” wide (when folded this uses an inch of fabric for each pleat). If that makes sense.
Also, I was a total idiot and sewed the straps 3” from the end on the outside of the bag fabric, but ACROSS the bag. So I sewed one strap to one outside piece, and then to the other outside piece right across from it, instead of to the same outside piece. I finished the whole bag, topstitching and everything, before realizing the mistake! So be sure, when you sew on the straps, that you sew them to one side of the outer fabric for each strap. Confusing to explain, but important for the bag to lay flat under your arm when you carry it!
Otherwise, man, this tutorial was so great and the bags turned out amazing! Thank you!!!
Jenn
Yes, I need to change the pleat instructions in the pattern. The finished pleat measures 1/2″, but you will use 1″ of fabric. Will change the wording there and also take a look at the other spot where you had trouble. Thanks for your comment.
I’ve just made this, and really enjoyed it. http://thejoyofthehousetomyself.wordpress.com/?p=279&preview=true thanks for the free pdf.
Not only is your project very clean and sharp, but so is your layout and photography. It’s an appealing layout.
Thank you so much for this tutorial. I, too, had a problem with the pleat measurements but figured it out when the bag body became smaller than the bag band. Re-doing it actually made the 1/2″ pleating easier because I now had a small crease in the fabric as a guide for the 1/2″ placement. LOL It worked out well! Thank you again for sharing your talented work with all of us at Pinterest!
Hello!! These are super cute bags! Thank you so much for the pattern. I’ve been following along with the comments. I’ve made it through the first page of instructions. My little road bump comes with instruction #4. You say sew the outer band piece to the outer bag piece. Do I use the fleeced outer band or the unfleeced outer band? I’m assuming I use the fleeced because it is on the outside of the bag, but I just wanted to be sure. Thank you so much!
How big do i need to enlarge this pattern to? Thanks!
Where do you get your fabric
Love the patterns!
I loved this pattern the second I saw it on Facebook, and I finally got a chance to use it yesterday. My tote turned out beautiful! I, too, had a hard time with step #4 and ended up using my interfaced band piece on the inside, but once it’s all put together, it’s not even noticeable. I didn’t use interfacing on my outer body pieces because I used home decor fabric. Next time (tonight), I’ll do it the other way around. Thanks so much for a great pattern & tutorial!
This is a beautiful tote, and beautiful fabric too. Thank you so much.
Beautiful bas, thanks for the tutorial ! 🙂
Such a cute bag – will make one up tonight!
Thank you for the tutorial. I have bee wanting to make myself a bag that is simple for my first one. This looks like it would do great.
These are lovely, can’t wait to make one! Thanks so much for sharing!!
You can’t legally protect your work with Creative Commons The Supreme Court decision from 1879 regarding patterns….In 1879, the Supreme Court flatly stated that items made from patterns were not covered by any copyright the pattern might have. The Fair Use Act clearly states that only the pattern is protected; not what is made from the pattern. For more information read . http://www.tabberone.com/Trademarks/CopyrightLaw/Patterns.shtml
Also, your pleated tote is all over the Internet; I have several of the same patterns. The so called copyright protection should also protect consumers from getting duplicate patterns and patterns copied off the Internet but apparently doesn’t.
Hi!!!!
I was looking for a place to send you a personal email, but couldn’t find so i’m writing here :
last night i started sewing this pleated goregous tote and fourtunatlly it came out really really nice!!!!! i want to make another one soon….
thank you for the eleberated tutorial. i just printed it out at work and had it by my side when i was sewing, and it was very very helpful.
espically the accurate mesearmeunts. it helped me alot.
Thank you !!!
I loved making this tote! Thank you so much. Some lucky person at our school auction will end up with it, so I need to make myself one!
Thanks for this great tutorial! My bag came out so cute! I linked back here on my blog http://aztoid.blogspot.com/2013/02/tote-bag.html Thanks again for sharing this fabulous tutorial!
Made and bag and it turned out great! Thanks for sharing the pattern and tutorial!
Made it this weekend. Great tutorial easy to follow. Thank you
Thank you, this is the perfect decorative tote for me to try. I prefer not too many ruffles etc., but sometimes it’s nice not to have the completely rectangular shape on a tote bag. I’ve also just fallen madly in love with your red ladybug fabric.
I made this bag over the weekend using quilted fabric a la that famous designer and omitted the lining. I did have to use bias binding around the top edge since the lining wasn’t there. It turned out great! I’ve received several nice compliments on the design of the bag. Thanks for a terrific pattern! I’m ready to try it out on a few more scraps for a totally different look. 🙂
I can’t get enough of these totes! I just posted to my blog about it, with some photos. Thank you for this lovely pattern, Ellen!
http://www.multiplerealitiesblog.com/2013/03/pleated-totes-bags-dear-liza-the-long-thread-ellen-luckett-baker-pattern.html
Thanks for the tutorial! I had the same trouble at the pleats, made (and sewed) the pleats to be one inch(ie two inches of fabric).. It’s only when the resulting length did not match the tops that I figured I did something wrong. That will teach me to read through the comments first!
Thank you so much for this tutorial Ellen! It comes together so well and the directions are so easy! I will be making it often for gifts.
Beautiful bag! I am posting today on bag construction and am linking your site to tote bags. http://www.soyouthinkyourecrafty.com Thank you for your hard work! Heidi