

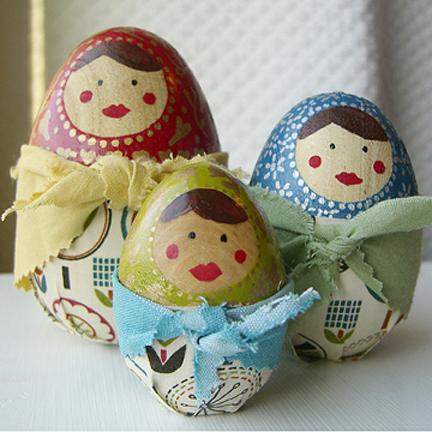
When I made the little egg man for the rocket ship I thought that wooden eggs would also make cute matryoshka style dolls. So here they are. Painted wooden eggs with fabric bottoms and little scarves. Here are some quick and basic directions. As you can see, I am not an artist so I think anyone with a paint brush can do this. Imperfections are the mark of handcrafted love! You could use pastel colors and they would make lovely little Easter gifts. These are probably the kind of dolls that would be happiest living on a shelf, but I’ll let you know how ours hold up to wear and tear.
Supplies:
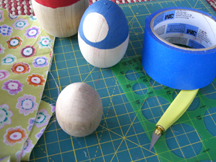
- 3 wooden eggs of varying sizes (available at craft stores)
- painter’s tape
- exact-o knife
- acrylic paint
- small paint brushes
- paint pen (s)
- spray polyurethane (I used clear satin for a little shine)
- fabric scraps
- scissors
- spray adhesive (multi-purpose craft adhesive)
Note: Before you begin, you might want to lightly sand the eggs. I did not sand mine and wish I had. The bumpy surface makes painting a little more difficult and the porous areas allow paint to seep under the painter’s tape when you are painting the upper portion.
Step 1: Cut a circle from the painter’s tape. I rolled out some tape onto my cutting mat, traced a circle and used an exact-o knife to cut it out. I then applied it to the egg where I wanted the face. Make sure that the tape is pressed down firmly all around the edges. Measure where you want the paint to stop and mark that with a pencil. Paint this area and allow to dry for about five minutes. Then remove the painter’s tape circle and touch up any areas where paint may have bled through.
Step 2: Paint the face. I used a small brush and undiluted acrylic paints.
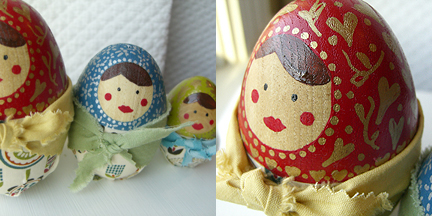
Step 3: Use paint pens and/or paint to embellish the top portion. Spray with a coat of polyurethane and allow to dry.
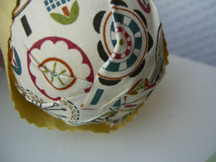
Step 4: Wrap fabric around the eggs to measure how much you will need for each bottom portion. Mark and cut. Then cut slits about 1″ long at 1″ intervals in the bottom of the fabric. Spray back of fabric with spray adhesive and apply to the egg carefully and quickly. On the bottom press down every other tab, then come back around and press down the rest. This will allow for a pleated look at the base (see image below). You may have to spray a bit more adhesive as you are working.
Step 5: Make scarves. Again wrap fabric around the egg and add a couple of inches extra. Cut a long, narrow triangle of fabric. You could finish the top, but I just folded mine under and used the selvedge ends. I used pinking shears for the edges.
Thanks for looking! Remember, all patterns and original designs on the long thread are for non-commercial use only. Make things, give them as gifts, enjoy them, but please do not sell them. If you do make these dolls, please add your photos to the Make it Monday photo pool at Flickr here. I would love to see your creations! Thanks.
You have such a lovely blog here! I’m so glad I happened upon it this morning.
I love this project and am definitely going to try to make a set of these soon. I have been obsessed with matryoshka dolls lately. These are so adorable!
I am totally making these! So darn cute!
These are so very cute! I shared them with a coworker who has already drained some real eggs for decorating with her daughter!
what a great idea to use wooden easter eggs to make matryoshka dolls, very clever
What a lovely idea and a beautiful blog! These would make fantastic Easter egg gifts. I hope you don’t mind if I refer to your blog over at 66 stitches. Thanks for sharing.
Love your blog! Love Make It Monday!
What a fun project! I made some of these – Easter girls in pastel colors. I’ll add my pics to the flickr pool as soon as I figure out how!
So funny! I was just leaving a comment on your blog asking you to add them to the Flickr pool! You did such a great job with these.
I am interested in using this craft in an ebook that focuses on culture camps for adopted children. I would like your permission to use it. May I?
Marcie
Beautiful!!!!
çok güzel bence
These are so beautiful they would be great year round.So clever.
These are adorable – I love ’em!