

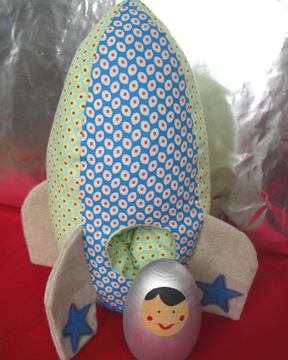
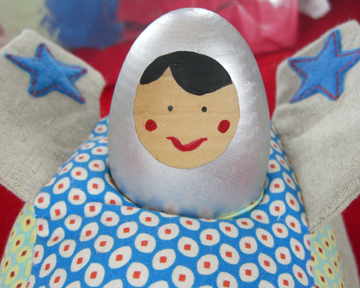
OK, all finished. Crystal got it right — it’s a rocket ship! Finally, I get to make something for a boy. I used quilting weight cotton fabric (from the Belle line by Amy Butler, available here), but it might be wise to try a canvas, tweed or wool felt. I hand-sewed the bottom and was concerned that the fabric was pulling a bit, so I whip stitched a piece of felt on top to secure it. The fabric and design of the rocket was so egg-like that I decided to use a wooden egg for the little rocket boy. I am so not artistic; therefore I tried to keep the design simple and the hand painting to a minimum. But I think I’d like to try some of these egg dolls as matryoshka dolls for Easter. Maybe with some decoupage fabric dresses? Always thinking of the girly stuff.
Instructions and template for the rocket ship are below. I’ll leave it to you to work on a little space boy figure if you want. Here’s the down-low: I bought a wooden egg from the craft store, cut a circular piece of painter’s tape and applied it to the face area, sprayed the body silver and came back and painted the face with acrylic paints. Then it needs a coat of polyurethane.
Instructions for Rocket Ship:
If you make one of these, please share it by uploading a photo to the Make it Monday Flickr group here.
Supplies:
- 1/2 yard of fabric (I used three different fabrics, plus some felt)
- scissors
- thread
- thin cardboard (cereal box will do)
- polyfill stuffing
Step 1: Cut all fabrics according to template below. Cut out four pieces of thin cardboard slightly smaller than the template of the rocket wings (leave a bit of room for sewing on the side that attaches to the rocket — I sewed right over the cardboard, but not sure if that’s advisable).
Step 2: Add your own appliqué stars if you choose. I did not provide these in the template, but you can handle it!
Add a pouch for a little figure (skip to step 3 if you don’t want to bother with this): I just measured the circumference of my egg, added extra for seam allowance and cut a rectangular shape (you want it to be snug so the little egg doesn’t fly on its own). I then sewed right sides together. Then my husband showed off his knowledge of pi to the 10th decimal place and helped me figure out the size of the circle for the bottom of the pouch (you’re on your own here since I don’t know the size of your little figure). I am told that you can determine the diameter of the circle you need to cut by taking the circumference of your little figure divided by pi. I then sewed the circle to the little “sleeve” and sewed the entire piece to one of the main body pieces of the rocket ship (cut a circular hole in the fabric first!).
Step 3: Make wings by sewing right sides together (leave the side that attaches each wing to the rocket unfinished). Turn wings right side out. Insert cardboard pieces.
Step 4: Sew pieces of rocket body right sides together, inserting and attaching wings as you go (bottom of wing should be about 1″ from the bottom of the rocket ship). It might be a good idea to reinforce seams with an overcasting stitch. Turn right side out.
Step 5: Sew bottom circle of rocket to four sides of the main body, leaving room for stuffing. I hand-sewed this part because I found that the wings got in the way when I tried with the machine.
Step 6: Stuff densely with polyfill or filling f your choice (add figure to pouch while you stuff). Pin and sew final seam together and reinforce if needed.
Blast off!
So cute! Seeing this is a great way to start a Monday morning. . .
I love it! what a good design.
This is great!
Very cute! I love the fabrics.
WOW! this is soooo cool…now I have to find some little dude to make this for…thanks so much for sharing!
So cute! I can’t wait to make this!
lindo, lindo, lindo!!!!! vou tentar fazer… parabéns!!!!
abraços,
liu
It’s great! The silver rocket man is killing me. He is so cute!
Thanks so much for sharing your pattern. 🙂
OMG!
I just love it! you must slow down with the goodness! i can’t catch up to you.
All great boy stuff, I can’t believe you have girls.
juju
Cute! 🙂 I can’t wait to have time to make this.. 🙂 Thank you for sharing this pattern.
Love seeing crafts for boys!
Wow, you are so generous to share the pattern! It’s tough to find crafts for boys, but my son will love this. Thank you!
WOW! I’ll definitely be making some of these!!!
Thanks so much for sharing your pattern! 🙂
xx
Thanks for such a great project for boys! I can’t wait to try it out. I’m going to be making a rocket-themed quilt for my littlest son and this will be great to go along with it.
Finally a cute toy for my sons that isn’t a robot! They’ll love this! Thank you!
I’m so excited to make this for my nephews this Christmas! If you wanted to make the rocket ship washable, an alternative to the cardboard would be to use flexible plastic that quilters use to make templates. Great tutorial, thank you!
That is so cute!!! Funny you say it is something for a boy, because my daughter would go CRAZY for this!
Oh my word…so cute!
THANK YOU! My daughter, 3, just asked Santa for a RocketShip and Spaceman for Christmas. Now, I can make one and she will love it even more. Thank you so much!
Hi there, love the rocket pattern – I have a question though, are the seam allowances included? if so, how big?
Thanks!
Jen
That’s a good question. I can’t quite recall, but I think I probably used about 1/4″-1/2″ (it’s to the end of my presser foot, so not exactly sure) seam allowance, followed by an overcasting stitch for added strength.
Sorry I can’t give you a better answer!
This is a great softie. I found out about it as it’ss printed in Australian Homspune Magazine No 67 (vol 9,12) on page 111. I can’t wait to give it a go.
Sharlene
Sharlzndollz.etsy.com
Sharlzndollz.blogspot.com
Thank goodness for cute boy stuff! Now I have an extra gift for my little man this Christmas. And since it was so easy to do, I can see making more for future gifts for friends and such. I blogged about it here http://aspiringartistry.typepad.com/aspiring_artistry/
Thanks for sharing this fun project!
Finally made these and posted on my blog. The boys that got them for Christmas just loved them. Thanks for sharing such a wonderful idea!
This is so adorable! I love it.
Hey,
just wanted to let you know I linked to this page on my blog. http://emilyflippinmaruna.wordpress.com/2009/04/01/ground-control/
Awesome idea!!! Great idea for xmas gift!
Hi. If I wanted to make one of these for an on-line charity auction, would that be alright? I’m not sure about your copy for sale rules. (though the proceeds would go 100% to donation)
Your rocket is very cute…but what puts it over the edge for me is the little man.
Thanks so much! I really appreciate when people share their wonderful patterns for free… My 2 year old has recently become obsessed with rockets and I really wanted to make him something unique rather than spend a whole lot of money buying some run of the mill plastic toy that would be forgotten in a few weeks.
Happy Holidays!
-C
Great tutorial, thanks a lot. I made a rocket for my son for Christmas.
Made these for my nephews and my son to be. Thanks for such a great tutorial!
Here’s my post about it.
http://johnandjackidaley.blogspot.com/2010/01/christmas-crafts-rocket-ships.html
Hi there, thanks so much for posting this. Just got invited to a three year old boy’s birthday party tomorrow on a space theme, so this wil beperfect for me to stay up late and make!
this is such a cute project!
I have included it in my Gifts To Sew For Christmas round up
http://jojoebi.blogspot.com/2010/10/lots-of-gifts-to-sew.html
thanks
Jo
My 3 year old absolutely loves his rocket. thank you for sharing your pattern – Blast off!
http://cookyousomenoodles.wordpress.com/
-Mariane
Love this post I made one for my little guy and he loves it!
http://sarahmayberry.blogspot.com/2010/12/rockets.html
Made my little rocket man (finally).
Easy pattern.
Thanks for sharing!
http://littlebitsofcrunchandfluff.blogspot.com/2011/04/rocketman.html
I thought I would point out a cheaper alternative that is still washable for the fins in the top of a strawberry box. I was able to cut all four from a 2# strawberry box and they were FREE!! I will point out just in case that the corners should be slightly rounded as they may poke through the fabric.
Hello.
I used your template and made the rocket. Adapted and made with felt. I loved the result!
KIsses
Hi, and many thanks to The Long Thread for this fantastic tutorial! I made the rocket man softie and instead of a wooden egg I made soft version of the astronaut (as it was a present for a 2 year-old). Love it! Thank you!, Ruby from Australia.
I have uploaded the pics to the link you gave. Hope you can see them? I used polka dotted red and blue fabric and a silver suited astronaut softie. 🙂
Used your terrific tutorial for a drop for the Toy Society. http://www.flickr.com/photos/70952905@N07/7422059438/in/photostream/ Added a bell inside for some extra fun. Thanks for sharing this great idea.
an excellent tutorial. I enjoy making these, all except for my not so wonderful experience with pi. FABULOUS!
So cute!!! Thank you for this great tutorial. I think my son will love his rocket ship, which is a perfect gift for easter.