

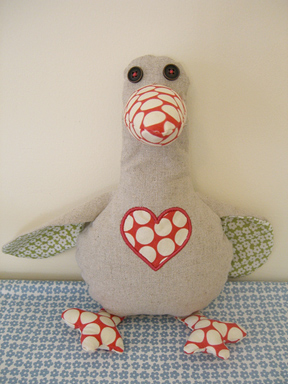
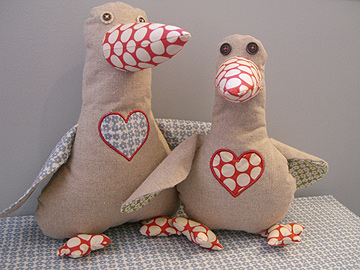
I call my five-year-old a goose all the time, so I made her one. And then I made another for my three-year-old with some of the fabric I bought at Reprodepot. Below is a picture of Lucy and Gertrude. The template below is for the smaller goose, but feel free to play around with the design. I appliquéd a heart onto the goose’s tummy (which I did not include in the instructions below); but you could embroider it, use heart fabric or fabric stamps, or just leave it plain. I think this would make a nice Valentine’s or Easter gift and I found this book of the same name that looks really sweet.
Supplies:
1/4 yard fabric (canvas, heavyweight cotton, tweed, wool felt, etc.)
scraps of contrasting fabric for wings, nose and feet
stuffing material (bamboo filling, polyfill, buckwheat hulls, etc.)
scissors
thread
two buttons
Step 1: Cut out fabric according to template: goose.pdf. Draw a 1 1/2″ vertical line where you want the nose to be, fold over your fabric and cut a half-circle shape.
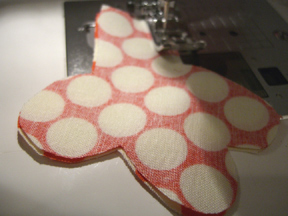
Step 2: Sew nose, wings, and feet right sides together (see photo below). To turn them right-side out, it might be helpful to have one of these tools. But I use the technique of safety pinning a piece of string into the top of the tube before I sew. Then I pull on the string to turn the fabric tube right-side out. (Caution: this technique can pull delicate fabrics and sometimes the safety pin comes open). Some people sew the string directly into the tube and then cut it.
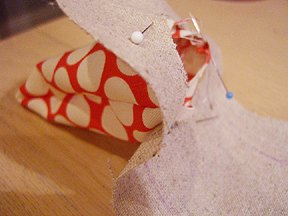
Step 3: Pin nose to body (see picture below). Tack on by hand and then machine sew like you would attach a sleeve. Since this is so small I found that pins got in my way, so had to do the hand tacking.
Step 4: Sew buttons or use embroidery floss for eyes.
Step 5: Stuff feet with polyfill.
Step 6: Place body fabric pieces right-side together and insert wings and legs (as shown in photo below). Wings should be folded in half lengthwise. Pin. Sew around the edges, leaving an opening between the legs.

Step 7: Turn goose right-side out by gently pulling (I found it helpful to get the wings and feet out first).
Step 8: Stuff the nose and neck, then the body. Hand sew bottom securely. I stuffed the head and nose with polyfill, the body with buckwheat hulls, then a little more polyfill to keep the hulls from falling out as I sewed it together.
All done! If you make this goose and you’d like to share your photos, please add them to the flickr group here.
This is SO cute! We’ve been reading “Chocolate Mousse for Greedy Goose”, it’s actually about lots of different animals but she always calls it “Goose” (she’s two). I’ll keep an eye out for the instructions, thanks!
I love birds in all kinds of sizes and shapes.
This one is absolutely wonderful . The beek is so sweet and the dotty fabric certainly suits it very well….
Very cute! I love the mix of fabrics!
Hee! Hee!
that is so cute!
I will make one for sure! and send you a picture
I love your goose and was just pondering what to make as a gift for an 18 month old boy just adopted by friends. I think this guy would be perfect-Thanks!
So Cute!!!
So nice of you to publish the instructions to make these. I hope mine come out half as cute as yours! Adorable!
I just love this! Thank you so much for taking the time to share a tutorial! Our 4yo and I just shot a bunch of photos of geese at the local bay; she’d love this!
Oh, I’m in love with Lucy!
Thank you so much for the gorgeous pics and (more importantly) for sharing the instructions!
I’m making toys for local refugee children and I’m sure they’ll simply adore this little lady …..
merci pour cette jolie oie Isabelle
So nice of you to publish the instructions to make these.
Super Cute!!! I can’t believe you have done a tutorial, so generous, thank you!
Hello! I really like your how to and I was wondering if I could translate it in French and add it to my list of how to as explained in my french post (http://www.petitcitron.com/index.php/component/option,com_mojo/Itemid,149/p,166/ and an English translation : http://translate.google.com/translate?prev=_t&hl=fr&ie=UTF-8&u=http%3A%2F%2Fwww.petitcitron.com%2Findex.php%2Fcomponent%2Foption%2Ccom_mojo%2FItemid%2C149%2Fp%2C166%2F&sl=auto&tl=en&history_state0= ) Of course, your website would be quoted and there would be a link!
Thank you, Perrine
Love it! Thanks for a great tutorial!
At last I was able to find real people to help me with my loan modification. I have retained another company but all they cared about was the 1% fee.
here is their site http://www.TheLoanModoficationPeople.com.
I’m still not out of the woods yet as money is tight but at 4% things are much better.
How cute are those two!!!! Just have to make one of them, or two, or…
Thanks for lovely pattern and tutorial.
Akhila
thanks for this! i call my sister goose (and i’m gander) so i’m going to make a pair of sister geese! i haven’t made them yet but when I do i’ll be sure to post pictures!
PS do you think this will work if i use terry cloth? i wanted to make a FUZZY goose but i’m not sure if terry cloth is heavy enough?
Thanks for your help
a.
Picture this… school hols and my 7 year old daughter wants to do sewing ( we’ve only made square bags before). The library has nothing so i google and find Lucy goosie and we’re off and sewing. The 17 month old doesn’t want to miss out on the action and is under the table pushing the foot pedal (just about sewing my fingers to goosie!) and having a ball with fabric and trims.We end up with the most adorable wonky upside down winged girl ever and Isabella “love love loves” her! Thanks for helping me be a good mother for a morning!!!
Oh I am so excited I stumbled across your site (I used your WONDERFUL superhero case tutorial). I have my very own “Lucy Goose” (she’s 5 months old) and she needs one of these. Can’t wait to get started. Thanks so much for all of your amazing ideas, patterns and tutorials!
I have just discovered this. Thank you so much for posting this fabulous pattern. So, So cute. My lttle niece Lucy will just love it. I’ll be making it for her next birthday, or maybe just making it because it is so gorgeous.
i absolutly love it =D i made my friend one for her birthday so thanks soo much for posting this…heres a picture of mine…its not all that great =S http://s223.photobucket.com/albums/dd263/stellaandscooter/?action=view¤t=rawwwwr.jpg
I thought I’d let you know that this Etsy seller is selling your pattern
http://www.etsy.com/view_listing.php?listing_id=31951635
I have reported it but maybe you should too.
Hey
This looks great! I was just wondering if anyone who has made it can let me know approximately how long it took!
Thanks!
I found this tutorial some months ago, and I’ve been planning ever since to do one goose for my boyfriend. I finally did one for our first aniversary and I just wanted to thank you for the idea and the patterns! It’s easy, it’s quick and the result’s lovely! 😀
You can take a look at my goose here!
Thank you soooo much again!
I love this tutorial! I made a little goose for my niece awhile back and it is much, much loved.
I just posted an article that used pictures of the goose I made here: http://www.examiner.com/examiner/x-1990-Minneapolis-Homemade-Living-Examiner~y2010m4d8-Worlds-largest-textile-garage-sale-hits-the-Twin-Cities-next-week
Hope everyone who reads this tutorial gives it a try…it is a great way to use up colorful scraps of favorite fabrics you might have squirreled away.
I love this goose! Just made one today and boy, it is cute! When I cut the pieces I left 1/4 inch of fabric all the way around for the seam allowance. I was assuming that the seam allowance was not included in the pattern pices. Other than that the directions were simple and easy to follow! Great Goose! Oh, and I thought of a name for the boy version…Golly Gander!
Love your pattern and tutorial. I modified it to be a duck instead of a goose for a little girl who looooves ducks. Here is a picture of the duck: http://untamingthespirit.wordpress.com/2012/02/01/crafty-duck/
Thank you so much.
Love the goose! Made it this evening…it’s my daughter’s name so couldn’t not when i saw it earlier! Thanks
I have made soome of these for my friends and they all loved them, Thank you for a fantastic tutorial. I have put a picture up on my blog, together with a link to your tutorial, http://ohsewwonderful.blogspot.co.uk/
Thank you 😉
Love these duck plushies! The pattern is great! Thank you for sharing. I featured this in my blog: http://www.plushiepatterns.com/lucy-goosey-plushie-pattern-by-the-long-thread/