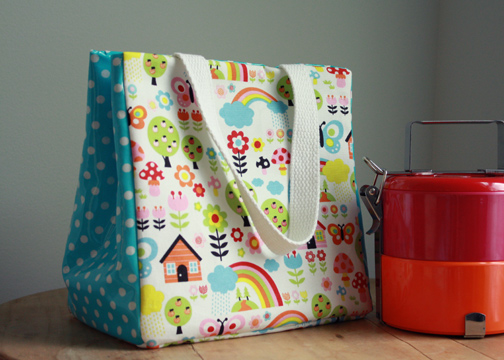

For some reason, I get obsessive over lunch containers. I love to look through the bento blogs and I’m always cutting the girls’ sandwiches with cookie cutters. I never thought I’d be this kind of parent, but here I am. I want their lunch to look good. So after I ordered this adorable stacking container set purely based on its appearance, I realized that it wasn’t insulated and wouldn’t fit in any of our existing lunch bags. I considered making a simple insulated sleeve, but then just decided to make the bag to also hold a drink, silverware and a napkin.
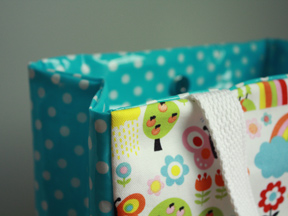
This bag is fully lined, insulated and fastens with a magnetic snap at the top. See below for variations and a link to the pattern. It was simple to make and is extra roomy (9″ x 9″ and 5 1/2″ deep). I used vinyl-coated cotton, but acrylic-coated cotton may be a safer and more eco-friendly choice. If you have a teflon presser foot attachment, that’s helpful but not required as you’ll mostly be sewing the vinyl right sides together. I got the printed fabric from Fabricworm, but it looks like it’s currently out of stock. It is perfect for my five-year-old and even has bits of glitter in the fabric.

Variations on this pattern:
- Make it your own size. Change the dimensions to suit your needs. This bag is large enough to work for an adult lunch bag as well. Simply choose your favorite fabrics or try a basic black.
- Use all cotton. This is a simple tote bag pattern and can be made with all organic cotton for easy care in an eco-friendly fabric.
- Add a flap. By simply inserting a lined flap in the final step, you can help keep food contained. You’ll need to move the magnetic snap to the front of the bag and use one strap attached to the sides.
- Make a tab. You could also make a simple tab with the magnetic closure attached to it.
- Add a zipper. Someone mentioned in the comments that she might like to add a zipper, which is a great idea. But I’d suggest omitting the side pieces and squaring off the bottom corners of the bag (similar to the construction of this tote). This would make zipper installation much less complicated.
- Add a pocket. You could easily add a pocket to the inside for an ice pack, an outer pocket for notes, or a side pocket for a drink. But this is a pretty roomy bag as it is.
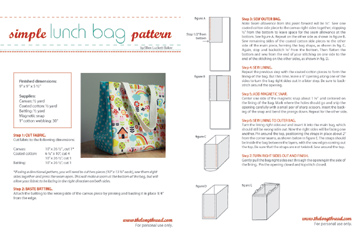
Click on the image below to download the pattern .pdf file.


Love this, very roomy. I always am looking for a roomy lunch bag. Big enough to take lunch for work, or put lots of snacks that I can munch on in the fridge also for work.
Wow, this is fabulous! Thanks for sharing! I’m planning to improve my lunch bag and this looks like a great pattern. Even though I am not five, I totally love the fabric. 🙂
I love this!!! I will be making one for myself and maybe my little dude too 🙂
Darling! And I love your fabric choices!!!
I cut my kids’ sandwhiches with cookie cutters, too!! It began as a way to get my daughter to EAT, but now has just become a small obsession. Love this lunch bag, I can’t wait to make one. Must have the cutest accessories at daycare!
Thank you! Thank you! For sharing your talents. I’m also obsessed with Bento boxes and have this strange obsession that they HAVE to HAVE MATCHING bags!!
I love this bag. Are you going to be putting these on Etsy as well? I would love to order one.
This is a great pattern and can truly be made in an hour or two. I just made one and I love it. I like the idea of adding a flap and may try that next. Here is a picture of my finished bag too. I shared this pattern on my blog. I really appreciate you taking the time to write this up.
http://ohsewnice.blogspot.com/2011/09/new-lunch-bag-for-my-wraps.html?spref=fb
I LOVE this, so cute, and I also love the fabric. I think I will make one for my daughter and one for myself! EEE! You have created a monster!
What is coated cotton?
Does anybody know how to sew the sides?? Very confusing.
Thanks for the lunch bag pattern, I was looking for one.
This is so cute! Thanks for sharing!
I just made one for me with diferents dimensions and i love it.
I tried to download the PDF and it’ says the file is damaged and could not be repaired. Can you help?
Thanks so much,
Dianne M
Hi there! Thanks for the tutorial. Could you please tell me the name of the fabric e.g. rainbows by so and so?
I am having a hard time understanding how to sew the sides. Why are there two pieces that overlap instead of just one solid piece? Please help.
Jessica,
I think you’re seeing the image of the two side pieces as they are sewn to the center. You’ll open them out and sew the bottom and other side of each piece to form a box shape. Hope that makes sense.
Thanks,
Ellen
I am looking at figure A and from what I am gathering you take one of the 6.5″ X 10″ pieces and sew it along the side to the canvas piece and then in figure B you do the same but on the opposite side of the first piece. Then you repeat these two steps for the opposite end of the canvas piece, is this correct?
So I have sewing the two flaps for the sides of the bag right sides together with the canvas piece attached to the insulated batting. I am looking at figure C and shaping the sewn together piece into the bag shape but I am confused as to how to close the sides with the coated cotton since it is made up of two pieces. Also, is the bag sewn inside out first then flipped right side out?
I need a new lunch bag!!! I’ll try this pattern, thanks!!
I’m sorry but I was very confused with these instructions! And there is no mention of lining in the supplies needed!
Hi, I just came across your pattern for this lovely lunch bag and decided to make one for my daughter. Unfortunately, I am rather confused with instructions at STEP 3. I don’t understand. Can you help please. Thanks
It is the latter part of Step 3 which is confusing.
I love this lunch bag!
How would I edit the pattern to fit an 8×8 plastic container? My sister always uses that size to pack her salads and I would LOVE to make one for her!!
Love this bag, and super easy clear instructions!! Thanks.
Ramona
Burlington ON Canada
Ellen
do you have a video on this lunch sack? I just don’t understand the tutorial and what to do with the side pieces?? Do you sew them together or not ? Open them out and then sew them together? I’m confused
Thanks
Patricia
The tutorial images are incredibly confusing. It looks like I sew the cotton sides through two layers of the canvas – two layers that are long and rectangular and not at all the shape represented in the actual bag. Any updates with better instructions?
I am also confused on Step 3. Has anyone had any luck on trying to figure this out?
Une petite traduction en français ce serait top ?
This is a cute idea! The directions are not written correctly in my opinion. Very frustrating. Will ripe out for the third time to figure this out! I think I understand now that other women have commented on it…
Can anyone explain the construction of the side panels to the main body of the bag. I am not able to proceed further.
Thanks
Thanks i got perfect paterns that which I want to see a lunch bag for myself