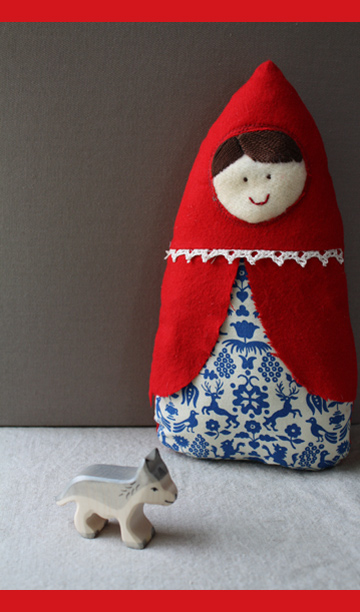
It’s all about the fairy tales this week. Today I made a simple Little Red Riding Hood stuffed doll. Just a few pattern pieces cut from scraps plus a little embroidery and you’re set. I used red flannel for the cape, wool felt for the face and some vintage fabric for the dress. Here are the instructions:
Supplies:
- fabric scraps
- embroidery thread and needle
- stuffing
- matching thread
- small sewing needle
- crochet trim (optional)
- Print out templates page 1 and page 2.
- Embroider the face onto uncut felt or fabric of your choice according to size of the face on the template. Then cut the face piece to the size of the outside template circle (or a little larger to give some extra sewing space).
- Cut out the rest of your fabric according to the templates.
- Fold the hood piece in half lengthwise and cut a half-circle at least 1/4″ smaller than your face piece. Pin the face to the underside and topstitch around several times.
- Sew the front pieces together: place the cape pieces aligned with the top of the dress front, then place the hood piece right sides together with hood pointed down and sew along the top, using a 1/4″ seam allowance followed by an overcasting stitch. (If you are using the crochet trim, you’ll want to insert it in this step.)
- Beginning at the bottom, sew front piece to back, right sides together. Be sure to leave a 1″-2″ opening at the bottom for stuffing.
- Stuff and hand sew bottom closed.
If you make one of these, I’d love to see it! Be sure to add your photo to the Make it Monday Flickr group.


She’s very cute. Thanks so much for the tutorial.
This is adorable and would make a great baby gift. Thank you for the tutorial!!
I love her face =) thanks for the tutorial!
So sweet! The fabrics are just perfect. Thanks for sharing.
oh super cute!!!
I love this! I love her sweet little face.
She is so stinkin’ cute!!! I posted a link to your tutorial on Craft Gossip Sewing:
http://sewing.craftgossip.com/tutorial-little-red-riding-hood-doll/2009/07/28/
–Anne
This one is going on my list. Very sweet!
So Cute. Thanks for the tutorial.
Did you paint the wolf? It would be fun to make all the characters from the story.
Nope. The wolf is a Holztiger wooden toy:
http://www.maukilo.com/brands/holztiger-89/holztiger-wolf-small-2198.html
This would be awesome in a little collection of fairy tale dolls. I love the little red riding hood and thanks so much for sharing.
your red riding hood doll is so sweet and lovely. i had to write because i just saw it on the craft blog and gasped a little because i made a story stone *just* like it last week, and i posted about it today: http://redbirdcrafts.blogspot.com/2009/07/story-stones-fairy-tale-series-tiny.html
i love the layer of blue and white fabric underneath the coat!
Argh! That is so, so cute! Thanks so much for sharing! I’ll be linking.
She is so cute! I love that blue printe fabric…where did you get it?
So cute! Thanks for sharing :).
She is adorable! Thanks – will use her for story time with the children.
Kate — the fabric is vintage. I ordered it from someone on Etsy over a year ago and have been treasuring the scraps.
Oh, my gosh! I love Red Riding Hood, and yours is so cute! Would you mind if I shrunk her down a little to make a pincushion?
re:fabric oh bummer…it is so lovely.
So cute! I saw this in Craft Magazine & had to stop by. Thanks for posting such a cute doll on your adorable site!
So stinkin’ cute I can’t stand it! 😀
Thank you for the tutorial, I’m anxious to make this! So cute and great for library corner.
Thank you! I have been looking for a first sewing project for my 5 year old. I think she will love this!!
thank you very much it is very perfect
I have that same blue pattern fabric from my mom. I think she bought it in Germany in the 60s. That is amazing to see someone else has it!
omgoooooodness love it my daughter is being little red riding hood and my other daughter is being a gnome for Halloween and she really wanted a red riding dolly of some sort but this would be so cute for her to sleep with at night thanks for sharing. i have tons of little girls tutorials if you would like to stop by my blog anytime..
thank you for the lovely tutorial and pattern. I made one today and linked to here from my blog. such a simple and fun sewing project!
http://www.tapuz.co.il/blog/ViewEntry.asp?EntryId=2026071
Inbal