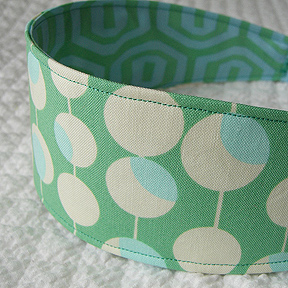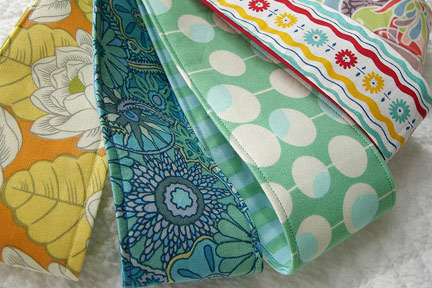


Here’s a quick and easy tutorial for a reversible headband. This makes a fairly wide headband — finished size of 2 1/2″ for adults and 1 3/4″ for kids, so adjust as you like. I used plain elastic in the back, but if you have short hair you might want to make a fabric sleeve, find some decorative elastic, or sew twill tape on top. This is a great project for fabric scraps.
Supplies:
- Fabric scraps (about 18″ long)
- Elastic (about 6 inches of 1/2″ width)
- Fusible interfacing (optional, but recommended)
Step #1:
Cut out template (headband-template.pdf) and make sure it works for your head size. Adjust as needed. Cut one piece of each fabric and one piece of fusible interfacing.
Step #2:
Iron interfacing to back side of one of the cut fabric pieces. Fold down edges of both pieces by 1/2″ and press down (towards wrong side of fabric).
Step #3:
Pin two fabrics together, wrong sides facing, being sure to align them perfectly. Wind a bobbin to match the fabric on the other side. Sew along the outside edges, leaving an opening at each end. Cut your elastic to the desired length (about 6″-7″ for adult sizes, 5″ for kids). Insert into one end and sew into place with a zigzag stitch (reduce tension and use a wide stitch). Repeat on the other end.
If you make this project, please post photos to the Flickr Make it Monday group. Click here to see more Make it Monday projects.

These are so cute! I think I’m going to need to make a few tomorrow night.
these are so adorable…definitely need to make some of these : )
those are fabulous, what do you think of using Liberty? should I interface both sides?
juju
With Liberty Tana Lawn fabric you would definitely need to interface both sides, but it still might be too thin. Let me know if it works!
These are great! I want to make one. Did you make a casing for the elastic? Do you have a picture of the elastic part?
Thanks,
Liane
I did not make a casing for the elastic since my hair is long enough to cover it. I think I have a photo of that part and will post it tomorrow.
what a great idea, I have so many fabric scraps that I don’t know what to do with – plus, my daughter will love this.
ha do you know, I’ve been thinking about doing exactly this for such a long time and thank god someone’s done all the working out for me! I might actually get round to making one now. thank yoooo, they look fab. off to peruse some more of your blog.
Thanks for this tutorial! I found it last night and made a headband today. I posted two pictures of it to your flickr group 🙂
Adorable. Can you suggest a shop for decorative elastic? I would like to find someplace that offers a wide selection. I recently made 25 headbands for a nine month old. I used decorative elastic (I had a hard time finding anything cute) I then hot glued butterflys, flowers, bows, etc. I placed them in a box and labeled the box hair toys. Her mom loved them.
so fab! what a great project for remnants or scraps!
<3E
tootsweethandbags.etsy.com
These are cute, just the thing to stop hair flopping into my eyes when I’m working. Thankyou!
Those are great. Wish I could sew. 🙂
My daughter has been begging me to make her some headbands – thanks for the pattern and motivation! 🙂
love this headband! reminds me of when I was a kid, had long hair then and to keep it out of my eyes, I wore wonderful headbands … I have long hair again and will be making a couple of these …
thank you for your lovely tutorial.
queria muito saber oque vc coloca no meio do tecido pra ficar durinha a faixa.
I hope you dont mind…I posted about a headband I made today and linked it back to you. I love how fast and easy this tutorial was. Thanks
Kristin
PeaPodCreations.blogspot.com
I adore this!! I need to make me some of these!
Hey, love this headband…going to make some for our models in our next photo-shoot, would love to put the directions for this fabric headband in our on-line magazine, would be happy to give you credit, mention your web site, etc. Let me know your thoughts, thanks! LAURA
I LOVE these and plan on making some soon! I featured this idea on my blog today:
http://oopsey-daisy.blogspot.com/2010/04/wednesdays-wowzers-prepare-to-be-wowed.html
Thanks for the inspiration!
Alison
Well done! Thanks for sharing … I’ve posted a link.
I know this is an older post, but I’ve saved it in my stumbles forever and finally got around to making some last night. They turned out beautifully! I made 4 sets of matching headbands for me and my daughter! Thanks for the awesome instructions!
I finally found a great tutorial, that is free and the headband molds to my head. I made some the other day that were all square edges and they just didn’t fit right. I made my with an elastic encasing with 2 pieces of fabric (12 in x 1.5 in), although if I did 13 in, it would still fit alright. I sewed both sides of the fabric, leaving ends open to turn inside out (like headband), slipped in the elastic sewing at both ends, then attaching to the headband piece. Thanks again! I’ll be making more of these! ~Sandra – Beginner sewer ~
Hi! I posted a link to your pattern on my blog in my post about hair accessory tutorials. If you would like me to remove any reference and link to this tutorial, please let me know.
http://craftcompendium.blogspot.com/2010/12/hair-accessory-tutorials.html
Hi, thanks for this tutorial…I felt like sewing tonight, and something I could start and finish tonight! So this was fun,easy and fast to do!
Thank you! I just made one and I love it!! So cute 😉
Great!
Thanks so much this is a great idea and I can’t wait to make these with my daughters.
These are so cute! I agree sort of confusing but a great, cute, creative idea! Thank you!
Love this idea!!! I’m pinning this one…
Love the pattern –
One quick question – I’ve haven’t used interfacing before. SO with the interfacing, am i correct your not making a tube and turning it? Just fold in edges and carefully and sew?
Also – as a beginner – are there tricks to sewing straight? (Im used to hiding my errors by flipping the fabric :))
I just made one of these for my daughter and a matching one for her doll. They are so adorable! Thanks for the tutorial!
Gracias por el tutorial, muy bien explicado
I am in love with these! I can’t wait to make them! Do you mind if I sell the finished products?
looks sooo easy and fun. gonna make some soon. 🙂
I have made a dozen of these now. I had to change somethings because I didn’t understand part of the instructions, but I am in love with making these. Thank you for posting!
I tried making this headband for a friend, tried twice and am thinking about giving up. The shape of the headband makes it puff up in the back and it looks funny:( I’m not experienced enough with sewing to know how to fix it… I’m glad other people are having success, but I’m not. I tried once with interfacing and the second time without interfacing, thinking it would lay flat without it. Unfortunately it didn’t work. I appreciate your post though!
@heather – While I’m not the creator of this tutorial, I do have a suggestion! When you fold over the edges of the headband after you apply the interfacing, try making small clips (1/4″) around the curve so when you do press in the edges toward the wrong side of the stiffened fabric, they lay flat 🙂 These clipped edges will not be seen because you will be doing the same to the other side after you sew the wrong sides of the headband together!
AMAZING tutorial – I wear a ton of headbands and I love this style the most – thank-you so so so much! An easy way to use up all my left over printed canvas!
to Heather.. you may want to cut the headband narrower. I am going to make one for my grown daughter but know this would be too wide for her small head as she is petite. I think it is made to wear close to the forehead also so adjustments can be made to make it lay down.
thanks for the pattern and directions for child size!
These are soooooo cute!!! I made a bunch of these today.
Hey. I don’t use interfacing at all, but you can use interfacing on both sides if you want to, just be aware it will be that much harder to turn right-side-out, and will be that much stiffer.