Sewing Room Clean-Up

sewing-room-before.jpg

I am a slob. I hate to post this photo, but I know how it makes people feel good to see the mess of others! Hope you’re feeling better about your own mess.

sewing-room-after.jpg

I did some cleaning out and re-organizing this week. It really was getting quite unmanageable. I decided to stop using plastic containers for my fabric because it just becomes a jumbled mess. We’ll see how this works. I also plan to make some fabric panels for these shelves because I don’t like to look at clutter, though I do like to make it.  We’ll see if I can actually get some sewing done soon.

Etsy Finds Friday

etsy-5-9.jpg

All ceramics today. Clockwise from top left:

Apple Salt Shaker from StudioÉLAN, $28.

Gray Vessel Set from up in the air somewhere, $44.

Reclaimed Tea Cup & Saucer from Mudpuppy, $35.

Handmade Ceramic Daisies from Artful Mosaic Supplies, 15 for $7.95.

Dogwood Flower Dessert Plate from Whitney Smith, $34.

Gray Cup with Atomic Pattern from Vessels & Wares, $14.

If I told you a secret Small Ceramic Plate from Christina Romeo, $52.

Little House 2×2 Tile from Gretchen Kramp, $14.

Little Friends from Runny Bunny, $6.

Photo Shelves

make-it-monday.jpg

shadowboxes1.jpg

shadowboxes2.jpg

I’ve had these shadow box shelves sitting around the house for a while and had some printable canvas, so decided to add photos to them. These photo shelves could hang on the wall, be stacked on a table or used as a key shelf by a door. They would be nice painted black with sepia-toned photos. It occurred to me as I was taking pictures that you could make an adjustable doll house with these wooden boxes by backing each one with fabric or patterned paper. They’re just the right size for this.

Supplies:

  • Wooden shadow boxes (paint them if you want)
  • Printable canvas (from the office supply store)
  • Computer and printer
  • Scissors
  • Staple gun

Measure the outside of the wooden frame. Using Photoshop or other photo program, adjust your photos to size and print on canvas cloth. Be sure to cut out space for hangers on frames. Staple to frame with staple gun. That’s it!

back-staple.jpg

7 Projects for Your Child’s Drawings

With Mother’s Day coming soon, I’ve been thinking of things we can create with the children’s drawings. So here are some ideas:

appliue-tee.jpg

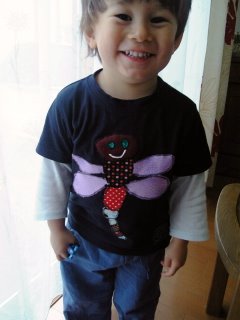
#1 Applique Tee from a bit of this and a bit of that: This would work for a bag or hand towels as well.

embroidery.JPG

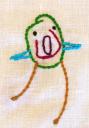
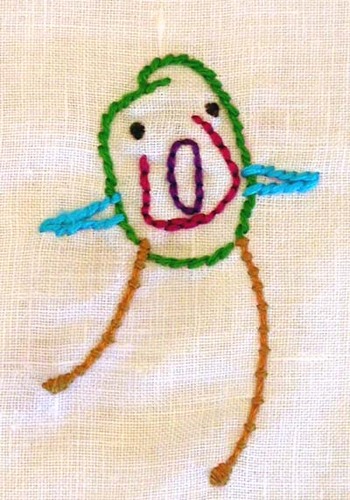
#2 Embroidered Child’s Drawing from Bella Dia: This project idea has been featured all over the place, but this is a nice example. Great idea for pillows, hand towels, or framed art.

shrinky-dink-ring.jpg

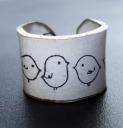
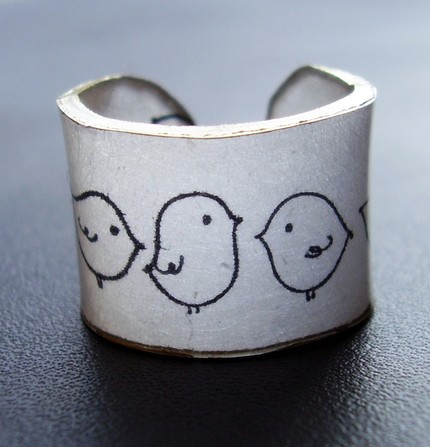
#3 Shrinky Dinks! Make key chains earrings, necklaces, etc. Check out these rings from Dillon Designs for inspiration.

gocco2.jpg

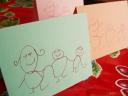
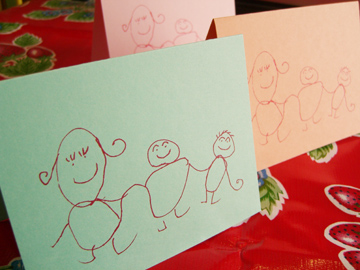
#4 Note Cards: Make some stationery or note cards for your mother. I used my Gocco printer here, but you could make these by scanning artwork into the computer and printing on card stock or stationery paper.

softies2.jpg

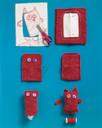
#5 Softie: Turn your child’s drawing into a stuffed animal. Here‘s a good example with instructions from Martha Stewart.

fabric-collage.jpg

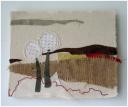
#6 Fabric Collage: Re-interpret your child’s drawing as a fabric collage as seen on bloesem kids craft projects with Arounna Khounnoraj (all of her projects are wonderful, by the way).

bird-vase2.jpg

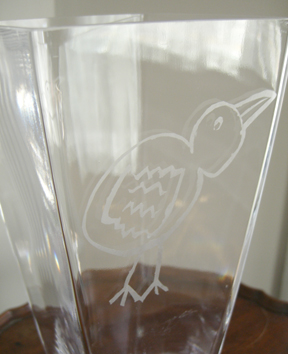
#7 Glass Etching: Try this to turn a plain vase or set of glasses into something special with etching cream or glass paint.