Gocco Invitations

gocco-invitation.jpg

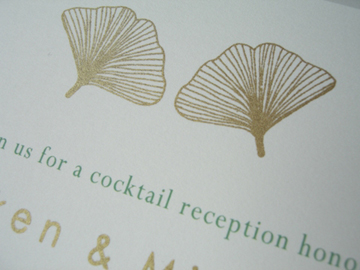
My first real printing project using the nifty Gocco printer.

I drew these ginkgo leaves, scanned them into Photoshop and then printed them and copied with a photo copier to make a carbon screen for the Gocco. I like using the metallic inks because you can’t get that effect from a printer. I wanted to use silver, but it looked a bit flat. Since the invitation was large, I printed the green lettering on my inkjet printer and then stamped the image and the name of the couple with the Gocco printer. I have definitely learned that when you are making the screen, it is best to hold it down for about 20 seconds and let the image really burn into the screen for full inking. Looking forward to making lots of fun stuff with the Gocco!

Class Projects

birds.jpg

butterflies.jpg

After seeing this and this, we decided to try this simple class project for end of the year teacher gifts. We gave each child (three and four year olds) a shape to decorate, with the only limitation being no stickers or three-dimensional objects. We used thick watercolor paper for the shapes and then I spray mounted them to acid-free paper and framed them together. I have found group art projects for young children rather challenging, but this allowed us to have some control of the project while giving the children the opportunity to do their own work. I think the variety of media and colors made a nice collection and represents the unique personalities of the children.

Gocco!

My husband gave me the ingenious little Gocco printer for Christmas and I’m ashamed to say that I just took it out of the box today.  I am intimidated by objects that require me to read instructions (particularly when they are in Japanese), but these great tutorials here and here got me through it and it turns out to be very simple.  I now understand this Gocco craze!  If you have not heard of these, they are basically mini silkscreen printers that burn the image and print it in a couple of simple steps.

gocco1.jpg

I worked on this with my five-year-old who brought home a Dr. Seuss-ish drawing from school of her name in cursive made into people.  The image needs to be in carbon to transfer to the screen, so I had her re-draw it with the carbon pen provided.  Lost some of the detail of her original drawing as you can see below, but still great.  I guess I could have traced the original.  You can also scan in or create an image on the computer and (from what I gather) print with a laser printer or make a photocopy. 

gocco-drawings.jpg

Anyway, all you do is make a screen of the original, ink it and print away.  I look forward to trying some designs of my own and want to try multiple colors.  Good-ness over at Etsy has a good price on the basic set. 

gocco2.jpg 

Egg Press Studio

paper-dolls1.jpg

I’m a big fan of letterpress and paper dolls. I have seen some things from Egg Press Studio but never made it over to their site until today. I love their stuff. Stitchable screenprinted fabric kits, woodgrain stationery, paper dolls (pictured above), gift tags and children’s stationery. All great designs. Pearl Paper Dolls set of 5 limited edition prints, $35.

Stormy Day Dolls

dress-up-dolls1.jpg

After seeing this post at Sugar City Journal I’ve been thinking about making some personalized paper dolls, but it seemed like so much work to cut out all of their clothes and my kids get frustrated when the clothes don’t stay on the dolls. We have a toy similar to this one from Woodkins, so we made some personalized dolls from cardboard and card stock. The hardest part was trying to get the kids still for a picture. They drew some hair, but you could add some with yarn or make changeable hair cut-outs. I then cut some fabric scraps and let them change the clothes around. You can make a dress by slipping the fabric over the leg separation. Creating and playing with these dolls occupied them for much of the afternoon!

dress-up-dolls2.jpg

dress-up-dolls3.jpg