Kaleidoscope Quilt

auction-quilt-final

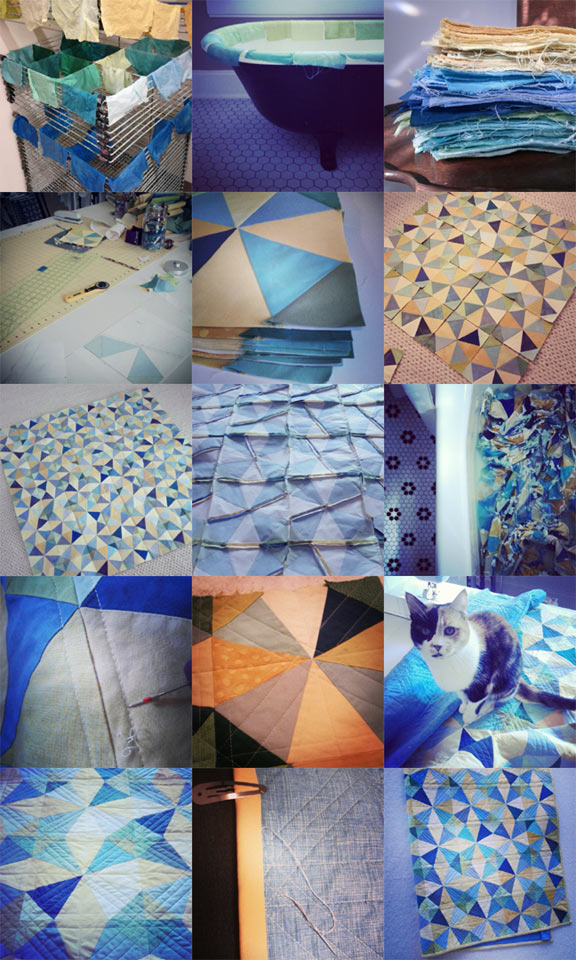
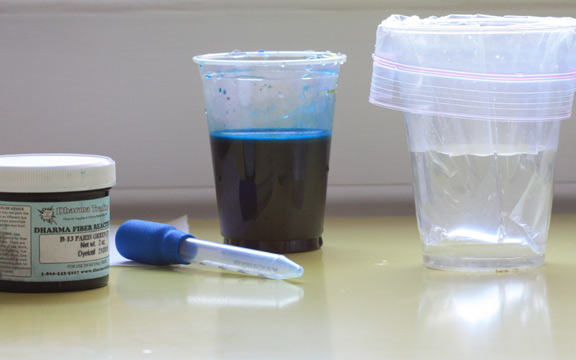
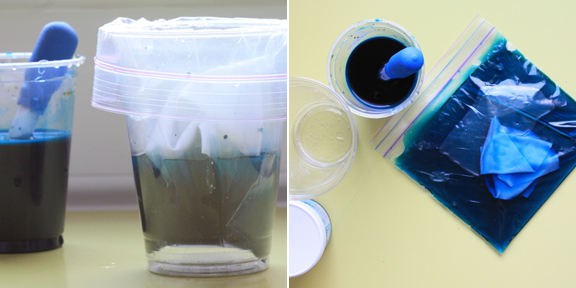
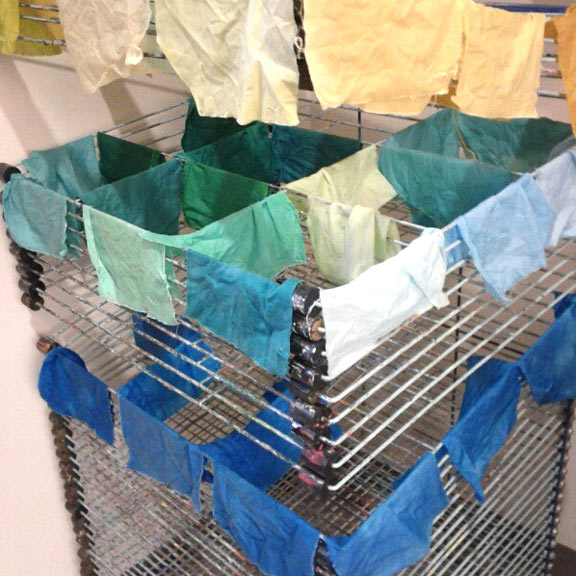
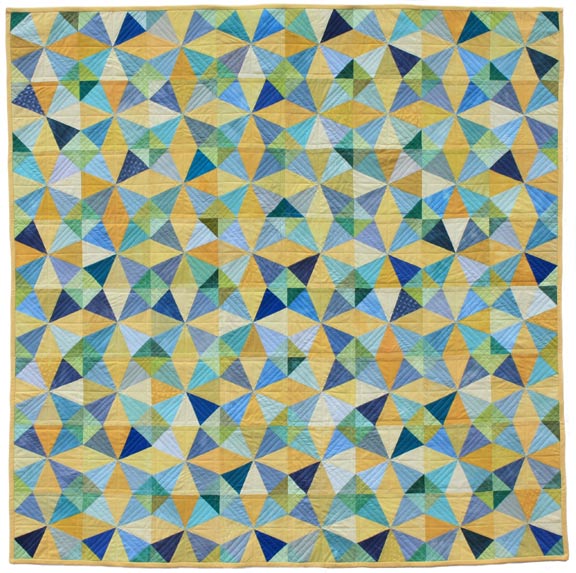
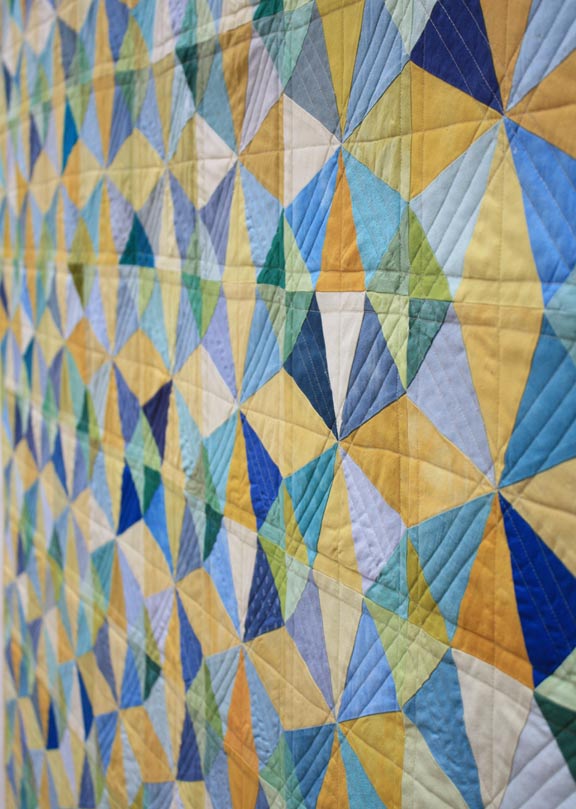
The kaleidoscope quilt I’ve been working on for the past several months was finally finished in time for last night’s school auction. Each of the kids at the school (almost 400) dyed a square of fabric, which I cut up to make this quilt, paper-piecing each block. You can read about the dyeing process here. Of course it didn’t sell for as much as I’d hoped at the auction, but I’ve learned not to take that personally. Just wish that all my time could have resulted in more money for the school and I will definitely not break it down to figure out my hourly rate, because that would be too disheartening.

auction-quilt-final3

auction-quilt-final-detail-

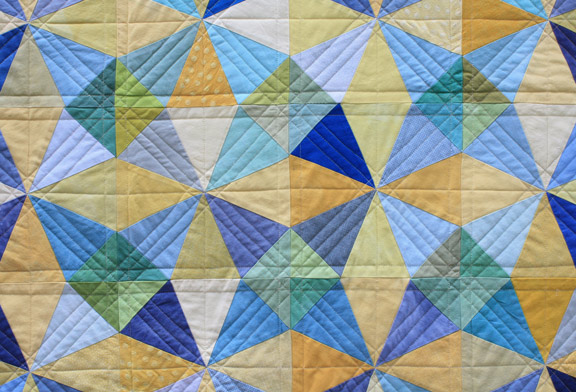
Here are my Instagram photos of the process, which I thought I’d share in case you don’t follow me over there. These days I really enjoy taking photos of the process and I’m trying to take a step back and enjoy the work more, rather than focusing on the end result. You can see that I sewed the blocks together with the paper backing still attached, then wanted to speed up the process of removing them so eventually the quilt top landed in the bathtub. They do make a dissolvable paper for foundation piecing, which I will definitely try next time on a smaller project. My walking foot was skipping stitches (tried everything including tension, replacing needles, cleaning machine, etc.), so I eventually had to get a new walking foot and an adapter so it would fit my older Babylock Ellageo machine.

If you’re interested in making this quilt using the foundation piecing method, I posted the templates that I created here.

instagram-quilt


Bunny Stitching

bunnies-auction-project

Happy first day of spring! Look, some bunnies are here to celebrate! I just finished up an auction project that I worked on with my daughter’s fourth grade class. Initially we were thinking of making a large-scale cross-stitched canvas, but there are two bunnies and a guinea pig in this classroom and it just felt like we needed to capture their personality rather than making a stylized version of a bunny. So I bought some tapestry wool and we got stitching! I tried using some yarn I had on hand, but it frayed as it was pulled through, so I’d definitely recommend using tapestry wool which is especially designed for stitching.

Each of the kids had a turn with this project, but I did end up doing lots of stitching myself to get this done in time for the auction this weekend. One of the teachers helped and they were both so patient with me being in their classroom all last week, even though I still have trouble not talking in class!

guinea-pig-detail

I started with the photo below that I edited in Photoshop because of course the animals wouldn’t pose like this. Then I had the sudden realization that these sweet little bunnies don’t look that much like bunnies at all! One is a big fluffball and the other has down-turned ears. And the guinea pig was tricky! We stitched on colored canvas fabric, then I added some colored asterisks stitched up top, then stretched it over a canvas, which also serves to hide the messy back side. I think it would have been interesting if we’d stitched some brightly colored patches into their fur, but another idea for another time!

This was a lot of work, but the kids have been so excited and I think it would look adorable hanging in a child’s room. I really enjoyed taking the time to relax and stitch by hand, and now I want to make portraits of our own pets. I just have a quilt to finish up and I’m done with auction duties!

bunnies-auction-project-pho


Fabric Dyeing with Kids

fabric-dyeing1

In a previous post, I mentioned that the fabric used to make the school auction quilt, which is still in progress (finished quilt top here), was dyed by the kids at my children’s school. In order to get almost 400 kids to dye fabric and attempt to make each piece unique, we used a small batch dyeing process using plastic bags. Sarah from Intown Quilters here in Atlanta told me about this method. I ordered my reactive fabric dye from Dharma Trading. They have a great variety and an educational website to help you with the process.

First, I cut all the fabric into 7″ squares, then pre-washed it, dried it, and gave the pieces a quick pressing. For this project I used a white Kona cotton and some other white and neutral cottons and linens, but you might want to use fabric that has not been treated. I mixed several colors of dye, each in a small cup and mixed  the soda ash with water in another container. We then folded plastic bags over larger clear plastic cups, filled them with warm water and let the kids squeeze in some of the concentrated dye with a medicine dropper (another parent thought of using the medicine droppers so the kids wouldn’t spill and it worked out very well). We then added the soda ash mixture, dropped in the fabric, sealed the bag, removed the bag from the cup,  and let the kids squish around their bag, gently. That word “gently” is key when working with five-year-olds. Out of almost 400 kids, we only had two minor spills, so not bad! Many of the kids enjoyed the sensory input of squeezing the bag of warm water and didn’t want to give it up.

fabric-dyeing4

Some of the bags we let sit for just 10 minutes and some a couple of hours. I changed the dyes up frequently, varying the colors and intensity so we could get the widest possible range of blues, greens, and yellows. Then I rinsed the fabric, let it air dry, then ran it through the washed and dryer. I think I bought nine different colors, but mixed them together in various ways and changed the concentration with each batch. Here is an Instagram photo some of the fabric drying on a rack at the school. The very patient art teacher let us dye fabric with the kids during art time.

Hopefully I’ll get this project basted and quilted soon!

fabric-drying

Printable Masks

Looking for a last-minute Halloween costume idea? Or pretty wall decorations for a child’s room? Photo props? Danielle of Kitschy Digitals wrote to me about her new line of printable masks. They are so cute!

Dress up your kid as a scarecrow (flannel shirt, overalls, hay coming from arms and legs) and use the  mask from the Wizard of Oz set (designed by Chelsea Ann Redinger) or try the sweet butterfly mask below (designed by Melody Miller) and whip up a pair of these wings. Done!

I don’t know how these holidays always sneak up on me and I am in awe of you organized folks out there who make Halloween costumes in August! This year my seven-year-old is dressing as Ginny Weasley from Harry Potter and my nine-year-old is going as a recycling bin. You might be able to tell that my girls have slightly different personalities. I decided not to make any of the Harry Potter attire because it is so easily available, but we are dyeing her hair red! For my older daughter’s costume, I cut the bottom out of a recycling bin and also cut arm holes, then we’ll attach paper and cans to it. The irony of this costume is that by destroying the recycling bin, it’s not very environmentally-friendly. But we are planning ways to re-use the bin and my daughter already made a coaster from the armhole plastic piece by gluing felt to the top.

You can see my kids’ costumes from last year here and read more about my costume advice here. My favorite costume that my older daughter wore is still the Violet Beauregarde as a blueberry from Willy Wonka. Loved that one. Good luck to everyone who will have late-night Halloween sewing to do!

Backgammon Skirt Tutorial

Louise from I’m Feelin’ Crafty invited me to participate in her Sew Ready to Play series, where bloggers are sharing sewing projects inspired by games. Predictable as I am, I made a skirt for my girls. And I used triangles! Very similar to the bunting skirt that I made for the Moda Bake Shop a few months back, this is a simple elastic waist skirt with a patchwork hem band. Inspired by a backgammon board, this easy skirt uses bits of my new fabric for Kokka on a charcoal chambray background.

Visit I’m Feelin’ Crafty to print the .pdf tutorial and see the adorable projects that people have been making. Here are a few of them:

Hopscotch Hanging Organizer from The Southern Institute.

Super Mario Brothers T-shirt from Skirt as Top.

Memory Game, made by Louise.

Plush Pizza from Cirque Du Bebe.