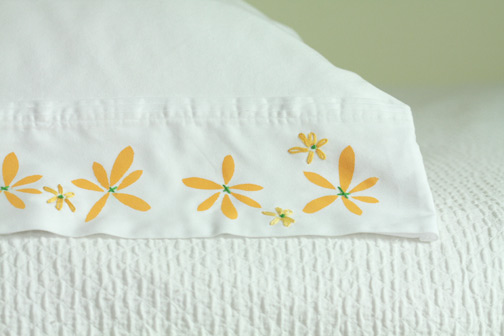

I just bought some organic sheets for the girls’ beds, but wanted to add something sweet to the plain white. So I used a freezer paper stencil and some embroidery to make these cheerful daisies. I’ve been inspired a lot lately by Vera Neumann prints. Here’s what you’ll need:
- daisy template
- painter’s tape
- craft knife
- cutting mat
- pillowcases
- freezer paper (found at the grocery store)
- iron
- fabric paint
- foam or stencil brush (I use the end of a foam roller)
- scrap cardboard or plastic
- embroidery floss in yellow and green
- embroidery needle
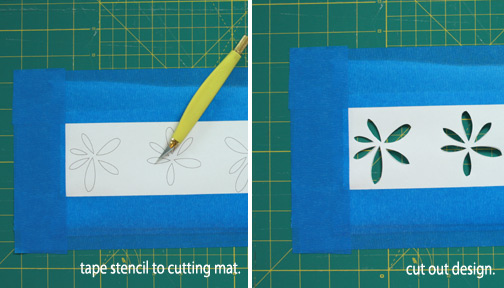
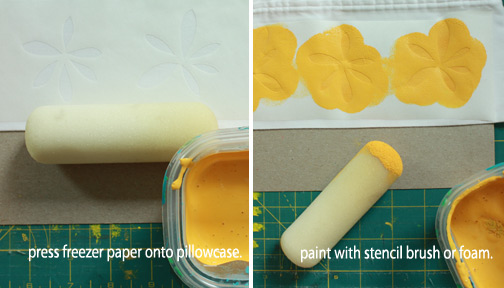
If you’ve never made a freezer paper stencil before, you’ll find that they couldn’t be easier. Just print out the template, cut into two rows and tape it on top of the freezer paper on the cutting mat. Cut out the design with a craft knife, as shown below. Press the shiny side of your freezer paper to the pillowcase edge with a hot iron (no steam). Place scrap cardboard or plastic inside your pillowcase so that your paint doesn’t bleed through. Then paint your design, wait a minute, then carefully peel off the freezer paper.


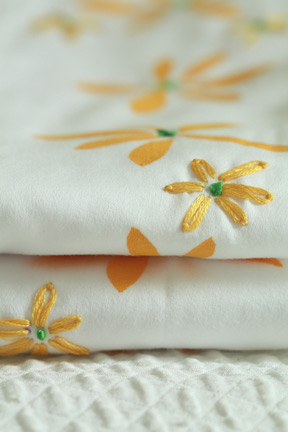
Allow the paint to dry for at least 24 hours, then start the embroidery. I used a lazy daisy stitch, french knots and a simple cross stitch. If you aren’t familiar with these easy stitches, there are lots of video tutorials for the stitching available on YouTube (here and here). I made my daisies a bit wonky to match the stencil design. You could also use this stencil for curtains, bags, skirt hems, dish towels, aprons or whatever you can imagine.


This is adorable! I love how you mixed paint and embroidery to wonderful effect.
What a coincidence! I bought a few of her scarves recently!
Absolutely gorgeous!
The whiteness truly accentuates the lovely flowers!
What an excellent idea! It looks amazing!
Thanks for the tutorial. I really like the mix of stencil and embroidery together.
love this personal touch. thanks for the tutorial!
how pretty! i love mixing the paint and embroidery. looks really eye catching 🙂
This pillowcase is perfect…I am making cases for children with the Conkerr Cancer project and will use your idea. I love the sweet simplicity of the design.
Gorgeous, how clever!
A little sunshine to drool on! So pretty!
That by far was the best freezer paper tutorial ever – and thanks for the lovely daisy design I think it will also look very sweet on a t shirt or the base of my daughters jeans oh yes!
what a beautiful fresh take on a pillow case!
Did you know you can actually iron freezer paper onto fabric? It pulls right off and stays put until you do so! Yours are so sweet!
Aww, they’re beautiful! What a pretty idea. Thanks so much, I’ll be linking.
its looking amazing…love it…
Hi
Love these pillow cases. I have never done embroidery but just have to make a couple sets. They are so spring looking and bright. Thanks for the links so I cam learn how it make the stitches. If not for those on you tube I would never be able to make them.
Thanks again
Pat in New Yor
I love this! A friend suggested the link to your site via Facebook. I’m feeling like a dunce, though. What is freezer paper? Would you be able to give an example of a brand name? Thanks! ~Heidi
I had completely forgotten about the freezer paper stencils, even though that is the reason I have freezer paper in the first place!
This is ah-dorable! I just really got into stenciling/painting on fabric, so this is great! Also, I love the daisies (rightly so).
Reminds me of the stuff i used to do in school in my Home Science classes. Crafty bit!
beautiful work with nice blend of embroidery and paint…