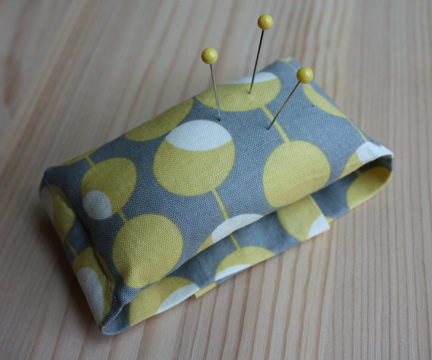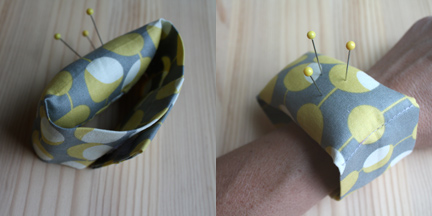

Attach your sewing pins to your body and you’re pretty much guaranteed not to misplace them.
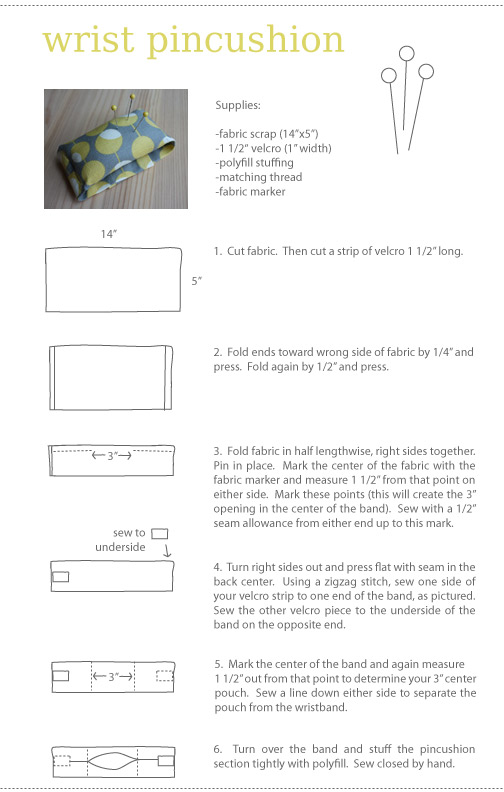
I’ve had pincushions on the brain after this post, so today I made a handy wrist pincushion. Simple to sew, it’s made from one fabric scrap, some filling and velcro. Easy! The measurements should be correct for an average sized woman’s wrist, but you can measure your own wrist and make necessary adjustments. The pincushion in the center takes up 3″ of space, so be sure to account for that. I thought about adding a cardboard piece to keep you from poking your arm with pins, but decided to leave that out as I found that I didn’t have any problems. But use caution!
Instructions are below. And if you make one of these, we’d love to see it! Add your photo to the Make it Monday Flickr pool here.


This is adorable! Here at J&O we’re always looking for a new way to use fabric scraps!!!
Thanks!!
I have similar pincushions that I bought and I love them. They are the only pincushions that I use. The only problem is when I don’t have one on and I forget that I don’t have it on and I try to stick a pin in my wrist. LOL!
ooh, thanks for the tutorial. I am alwasy looking for a fun present to make for my two SIL and MIL. this is perefect.
we wore these in high school home-ec. i haven’t seen once since. cute tutorial
What a great project! Thanks for the ‘How to’
What a great practical idea – but stylish as well…
Awesome! I feel like I am always dropping pins (not so great when I have 3 kids under 6 running around) this is the perfect solution!
Oh this is just so cute, I am totally going to have to make this now!!!
fabulous, I love this tutorial, it’s neat and handy, perfect!
This is such a cool little pincushion! I posted a link to your tutorial on Craft Gossip Sewing:
http://sewing.craftgossip.com/tutorial-wrist-pincushion/2009/09/22/
–Anne
You may want to line the back with a piece of cardboard. I made something similar a while back and the pins would sometimes poke through the whole cushion and stab into my wrist.
You could also line the bottom with leather or vinyl to prevent poking your wrist.
Cute idea I have a blog and I am going to pass this one on
Wonderful!
i have that fabric!! got it in ashland, oregon. lol
Not only do I love the print, but it looks so stylish on. Channels the ’80’s a bit yet could probably be worn out on the town’-)
Love it, can’t wait to make some of these. I was thinking I wold take a label off of an old pair of jeans to put on the back. It should be thin enough to sew through.
Thank you! I’ve been wanting to make one of these for a long time.
I just finished making this! It was exactly what I needed. I kept moving my pincushion from my sewing machine to where I was pinning over and over again and it was getting on my nerves! Thanks so much for sharing this! I don’t have a flicker to add mine to the pool but here is a picture of mine in action:
http://homeinntexas.tumblr.com/post/195322556/just-finished-making-a-wrist-pincushion-i-found
Thanks for posting the tutorial! I have been needing a wrist pincushion for a while!
I ahve a few of these but I put elastic on them rather than velcro so they slide on and off (and, after one too many stabs in the arm, I back mine with a bit of craft foam!) Fab things, should be on every little girls list of first thigns to sew!
I love this! I’m looking around for pin cushion ideas, too. I’ll be linking to this on my blog tomorrow.
wow that is great! SO clear instructions- thanks!!!
I love it. I am going to make one later today. I have been using wrist pin cushions for years. It sure save alot of time. I always know my pincushion is on my wrist. Like Hannah, I have stabbed my wrist when I forgot I did not have the pincushion on my wrist.
This is a great idea, it is another cute thing to add as a gift. Use as bow, put it into a basket with other supplies for as a gift.
Can make several in one morning! Thank you
HI
I made one similar but a little wider and big enough to go around the base of my featherweight sewing machine, the side where the wheel and the bobbin winder are……So I have the pincushion right there when I am piecing. Comes in so handy and I do this because my mother always had one on her featherweight machine and I got use to it. I wear the wrist one when I am doing handwork mostly. I always used it when cutting out clothing so handy to put pins in but hardly ever cut out any anymore!! Just little squares and triangles etc!!!
Love this one! Fits like a glove, doesn’t slide around – had to open it up and put a piece of thin plastic (template material) in under the batting though as a pin scratched my wrist up. Now it’s great! Would add a pic but don’t know how to 🙂 Thanks for a great pattern and clear directions!
Great pincushion!!
So wonderful to see one at right this moment. I’m busy pinning paterns to fabric and wished I had one of ‘these things’ whenever I stretched myself to grab a few pins. So now I’ll make one and make my work less stressful. Thank you.
By the way, I saw a pincushion on another website the other day. It was sewn over a plastic slide-on-bracelet, which also prevents one’s wrist from getting poked
Thank you for this great idea! I made this pincushion and filled it with crushed walnut shells. It is a perfect size and weight! Appreciate you sharing your fun idea!
Thank you for this tutorial! I would call it – not your grandma’s wrist pincushion. I’m so glad to find something a more modern than the standard cicle.
Thankyou for the tutorial. I am new to sewing, and this was my first project using an vintage Singer machine. I used old tights for the stuffing and it worked beautifully.
Magnifico tutorial, espero que no te importe pero he puesto un enlace a tu página web en mi blog. Creo que es un tutorial muy sencillo de hacer y muy práctico.
Muchas gracias.
What I did was use a stretch sweat band. It is about 6″ wide, I folded it in half then added the pin cushion. I found it easier to take on and off and it fits very snuggly.
Absolutely precious….am going to make one right now! Thank you for these directions!
I made a wrist pincushion almost two years ago and I almost can’t sew without it! I love it so much! Thanks for putting together such a great tutorial.
Just wanted to let u know this “how to” is still being used!! I made one today and plan on making more for friends. Thanks a ton! Happy 2016!