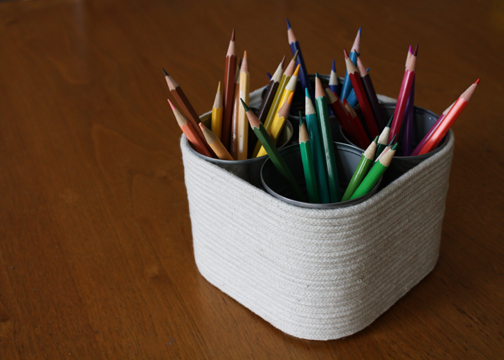

Today we made this caddy to hold the ever-growing supply of kid’s art materials. Made from clothesline and recycled tin cans, it’s an easy and inexpensive solution. You could use this caddy to hold various art supplies like we did here, or you could put it in the center of the table to keep utensils handy. And I’m sure you could think of other uses. We used four cans, but you could use more or less for your project. You could also add a braided rope handle. Here’s what you’ll need for the project:
- cans
- pliers
- clothesline (I bought mine at a fabric store, but I think you could pick this up at a hardware or even the grocery store. The plain cotton kind is best if you can find it. A package of clothesline should make it through several projects. I’ve been using mine for little backpacks like this one.)
- glue gun and glue sticks
- scissors
- masking tape
- Wash out four tin cans. Flatten any protruding metal with the pliers.
- Using the glue gun, put some glue toward the bottom of the cans to hold them together, two at a time. Allow the glue to harden.
- Wrap masking tape around one end of your clothesline.
- Using the glue gun, glue the end of the clotheslin in place at the bottom of one of the cans (not the underside).
- Wrap around the cans, pulling the clothesline as you go. Add a bead of glue when you get back to your starting point and continue to wrap it around, pushing down to keep the clothesline together. Continue until you get to the top.
- Leave a tail 2″ long. Wrap the tail end with masking tape, add some hot glue and tuck it in between the cans so that it sticks in place (see photo below).

If you make one of these, add your photo to the Make it Monday Flickr group here.

What a super idea! I NEED one of these for my desk ~ love the suggestion to add a handle!
I love this idea! At first I thought I’d make one for my son’s supplies, but I think I’ll need one for myself as well!
What an awesome way to add texture to a space and avoid those tacky plastic organizers…. LOVE it!
Very cute. We made one with multi-colored duct tape and plastic containers. Of course, yours came out looking like it could be from a store!!LOL!
Too cute! I love this and am trying to decide if I should make one first for the kiddos or for me! If you really wanted to get fancy–you could wrap strips of fabric around the clothesline first to make it color coordinate with the supplies or your room!
Wow-this is beautiful! Even the picture, just gorgeous! I can’t wait to make one! I’ll be linking to this as well.
I love this! It’s so simple and yet so stylish.
good idea. ? love it.
I love the repurposing of the tin cans. This is a much needed item for organizing my son’s art supplies.
we made it, at long last — and we LOVE it!! thanks for the tutorial!
http://teamcraunchatter.blogspot.com/2010/01/on-project.html
Great! I don’t need this at all, but it looks so great I’m tempted to make it!
I made one of these for my desk. I did one with cans and one with square trays. I use the circle ones like you made for pens and the square one I made for paperclips and office stuff. Thanks for the idea.
This is AMAZING! It will keep my daughter busy and its perfect for keeping this organized!
This was an awesome and fun project! I made five for my Before and After School Program.
I’ll share this with my co-workers. THANK YOU!
Cool and awesome idea! It was fun making it and it look nice.