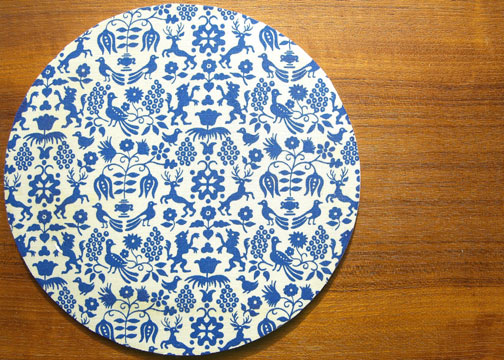

We had a dingy looking mouse pad bought from IKEA for $1. It was time for a makeover. I’m sure there are plenty of tutorials out there for this project, but here’s how I covered this old mouse pad with vintage fabric. So simple and easy.
Supplies:
- old mouse pad
- fabric scrap
- rotary cutter and mat
- spray adhesive
- fray check

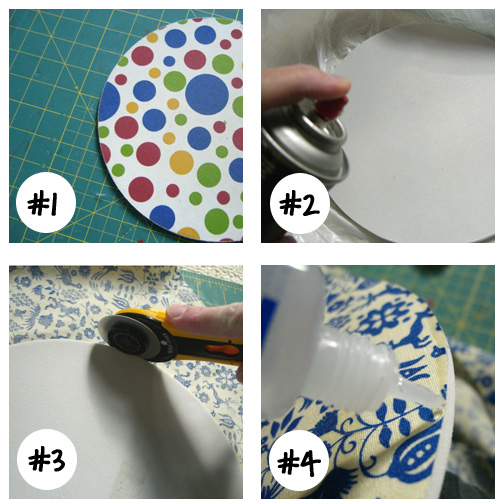
- Remove old fabric from the top of the mouse pad by gently peeling it back. If it doesn’t pull off easily, you can just add your fabric right over the top.
- Spray the adhesive onto the top of the mouse pad and press onto back side of fabric.
- Trim around the edges with the rotary cutter.
- Squeeze a little fray check around the edges to prevent fraying. Allow to dry.

brilliant.
Dang, that’s a great idea.
Now, I know this is elementary, but what kind of spray adhesive do you use? I sew a lot but I have never used spray adhesive, let alone Fray Chek. But at least I have a bottle of it somewhere.
Feeling the need to spruce things up.
I used Super 77 http://www.amazon.com/3M-Super-77-Spray-Adhesive/dp/B00006IFBE
I think that was a bit much for this job and it’s no doubt toxic. Spray a very light and even coating so it doesn’t soak through the fabric.
OH! I love this idea! Thanks and great work!
Great project!! I would like to link to it from Dollar Store Crafts!
Thanks!!
R
great tutorial! thanks for sharing.
ooh, cool! Thanks for the tutorial…my mousepad has been needing a little TLC
oh, i am so doing this. my pad is like 12 years old, but i don’t want to get a stinky new one. phew.
Does the fray-check show when it dries?
I am looking at the exact SAME nasty old mousepad right now and thinking it’s time for a new one. Ta-da! Brilliant!
Amy — the fray check dries clear! I’ve been using the mouse pad all week and no fraying.
What a great time to make over my mouse pad .Awesome idea!
What is fray chek and where do I get it?
Fray Check is a liquid that you squirt on the edges of fabric to prevent fraying. You can find it at your local fabric store or here:
http://www.joann.com/joann/catalog.jsp?CATID=cat2864&PRODID=prd2992
So easy — I love it!! Thanks for sharing.
Love it! Thanks for sharing, I think I’ll have to do this for the smudgy looking mousepads in my studio!
I can’t believe that I just ran into this on Twitter… I just got done cleaning my craft room, which also has my computer, etc in it- not even 1/2 hr. ago- I was thinking, “what can I do with this nasty looking mouse pad”… Nothing surfaced. Then I saw the tweet that saved the mousepad! Thanks for sharing- I kid you not, the timing was almost scary… LOL
I finally tried this yesterday, also with a cheapy Ikea mousepad, and it’s so cute except I managed to shave some of the mousepad off with the rotary cutter. Any tips for not doing this?
I am totally gonna do this!
Carrie — I think slow and steady is the only advice I have.
It seems that my rotary cutter has a plastic guard on one side that helped guide the blade. You could always make a cardboard template and place that on top of the mouse pad as you are cutting.