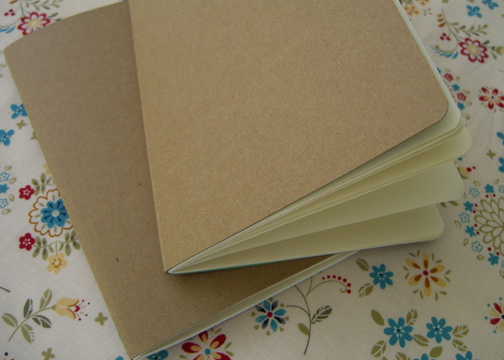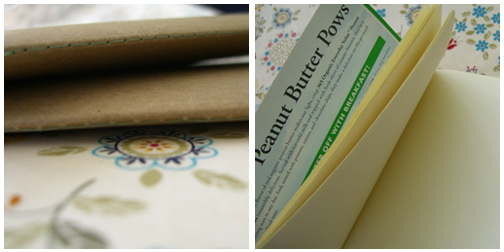

Here’s a quick and easy way to re-use a cereal box and make a useful journal from it. Ever use the Moleskine notebooks? I love them, so thought I’d make some of my own with materials that I had around the house. There are lots of possibilities for this project. You could stamp or print the cover, paint it, add a collage or a simple drawing, or use decorative paper to cover the inside. This would also make a fun project for the kids – they could decorate the covers and write a story.

I made this on my sewing machine, but I can’t be held responsible for broken needles! I set the tension to a very low setting and made the stitch long. I used 8 pieces of paper (for a 16-page journal) and wouldn’t recommend many more than that.
Supplies:
- cereal box
- paper (recycled or handmade would be even better)
- thread
- rounded corner punch
- paper cutter
- painter’s tape

Step 1: Cut cardboard box down to desired size. I made mine 10”x7” (for a 5”x7” journal).
Step 2: Cut journal paper down to size as well. You might want to deduct 1/8” to make sure the paper folds nicely into the inside of the journal. (see this next post for more instructions about this).
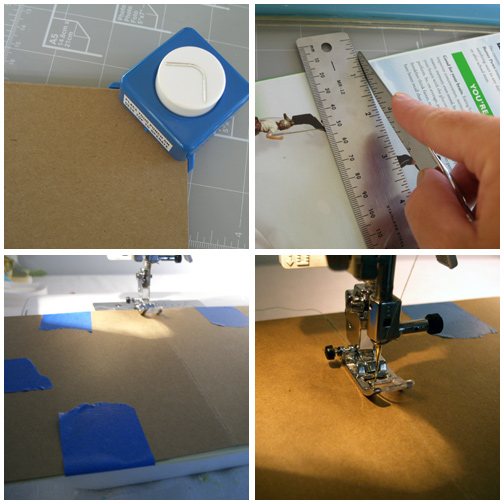
Step 3: Round corners with the corner punch.
Step 4: Score cereal box cover down the center until it folds crisply. I used a utensil knife and ruler to do this.
Step 5: Place cardboard (plain side up) on top of paper and tape together with painter’s tape.
Step 6: With sewing machine tension set to low, slowly stitch long stitches along the scored line.
Step 7: Fold over and place under a heavy book to press flat.

I think I should sew it by hand though…I’m not good with broken needles!
Well, I didn’t break a needle when I sewed it, but it might depend on your machine and the size needle you use. I think if you go slowly it should be fine.
Fun project! (I’m also giggling because we eat so many Peanut Butter Pows. And by “we” I mean “me.” YUM.)
I made a felt mini album for my husband this last Valentine’s Day,
http://gracehester.typepad.com/weblog/2009/02/valentines-day-felt-book-of-love-for-noah.html
but I love your variation of it! Especially the subtle “special touch” of rounding off the corners. Think I might try it this weekend to make a scribble-doodle book for my 4-year-old with scrap paper from daddy’s computer printouts. :o) Thanks for sharing!
I’m on the last page of my notebook today, this is perfect! Thanks so much, i’ll be linking.
Very useful! I think I am going to try to stamp something on these!
What a great idea! I think I may print out some old letters my boyfriend and I wrote to each other and bind them into a gift for him. I love moleskines and hand making it is a great way to add that special touch! (love the rounded corners too!)
Great idea! I really burn through those Moleskine notebooks! (and cereal.)
That’s awesome – I love being able to reuse! Especially since I never want to buy a sketchbook/journal cause I think I don’t have anything worthy of them! So they stay pretty and empty on the shelf…
love the idea! you could also do a pamphlet stitch by hand if you are scared to use a sewing machine. (and the pamphlet stitch is one kids can help you with, esp. with a larger/thicker needle.)
this is such a nice idea! THANKS!
Thank you! This is awesome. I love Moleskins…I hope mine turn out as lovely as yours
I made these 20 years ago for my kiddos. At the time we covered them with contact paper. I love the clean simplicity of these!
What a great idea. You can do so much with this. Make collages, etc for the cover
this is a perfect rainy day activity for me and my five year old! thanks for sharing!
Wow! This is fabulous! Even if I break a needle, I’m up for trying it out.
This is a great tutorial! Love the idea of recycling the cereal boxes!!! Thank you 🙂
Love these! And they would look cute using the outside of the box too.
This is a good use of recyclable material
Love to make this for notebook for the car thank you so much for sharing.
hugs
What size needle and what type of thread are you using?
Very clever idea! 😉
I was actually planning to make some handsewn journals like these this weekend–but with the design on the outside!
I once tried this but the papers on the inside would stick out athe side of the book. Center paper even more than the ones near the beginning and the end. What did you do to avoid this?
I think cutting the paper 1/8″ shorter than the cover does the trick. Mine did not align perfectly, but still worked pretty well. I’m looking at my Moleskine notebook right now and it appears that they cut the papers on an angle. You could do this on your paper cutter.
I used a 75/11 needle and no. 100 embroidery thread and had no problems, but my machine also does embroidery, so can probably stand up to the thickness. But really, a cereal box isn’t any thicker than oilcloth. I wonder if a ball-point needle might work best?
I made these yesterday. I posted about how they turned out on my website since I liked them so much! Thanks for sharing your very clear instructions.
I posted my response to your mention of irregular pages on my blog, but I thought I’d mention it here as well. I let the paper be a little wider than the cover and then when the journal was finished I lay the pages together on my cutting table with the cover open and hanging over the edge. I compressed the pages together with my ruler and used a sharp rotary cutter and trimmed all the pages even. They are now a little narrower than the cover, but I can flip the pages with my thumb they are so even. I just had to go back and forth a few times to get all the way through each sheet of paper.
I have another idea on this nifty project. Some cereal boxes are so cute (think Froot Loops and Frosted Flakes)that you could use the front of the box, centering your cutout to include your favorite part of the graphic. This would be especially nice for children,and could be given as little gifts or party favors. Thanks for the inspiration!
I LOVE this idea. I am always saving the cardboard from our cereal boxes for future craft projects so this is right up our alley!! THANK YOU!
hi,
made my own version with a link to you. thanks for the idea. we also eat the same cereal.
The interesting thing is the amount of paper you could get into it. What sort of sewing machine must they have at the Moleskine factory to do full size jotters? I’m imagining something powered by coal.
I wouldn’t imagine sewing through 8 sheets of paper and some cardboard by hand would be at all possible without a decent thimble. The sewing machine seems the best way here really.
Such a great idea! I thought I was clever for using cardboard packaging as postcards, but this is ingenious 🙂
Could staples work? I’m afraid I don’t have a sewing machine…
Love your idea! The kids and I wanted to make a geocache journal. I think we’ll give this a try for our expedition today.
Idea: I don’t have a sewing machine, but I thought perhaps a fine drill bit – I have some micro bits would at least make the holes. Then we could hand sew them. Your thoughts?
Sure, you could use a drill, but that might be over-doing it. Of course you’d need to make sure you have a piece of scrap wood under your cereal box. Alternately, you could use an awl or any pointed tool. Someone suggested staples, which would likely work as well. Depending on the size of your journal, you might need a long-armed book stapler.
I use soap powder boxes, they are super strong .I wouldn,t put them through the sewing machine though. Our cereal boxes in England would go through the sewing machine .I should have said I use the soap powder boxes cut down one side and shaped to hold my patchwork magazines
How sweet! I don’t have a sewing machine — or rather, I have one but it’s really horribly cruel to me — but I bet the kids and I could find a way to hand sew some of these without too much bloodshed. 🙂 Thanks for the tutorial!
This is great project! I actually did this by hand in a class I’m taking and it was REALLY hard. This way is faster and easier. Thank you so much! Something really awesome you could do is RECYCLE used paper such as fliers. We did it in my class and it gives the journal some more personality!
I need to try this – I already decorated my Moleskines with leather squares (tutorial on my blog) and this simply takes it to the next level! Great idea – thanks for sharing!
You have such a nice blog! You got a swedish award from me.
Just made my own set for Valentine’s Day. Thanks for the great idea!
http://homemadegiving.blogspot.com/2010/02/gift-5-love-notebooks.html
perfect craft for me as there is nothing better than making things with cereal boxes and sewing paper!
Great Idea! I am going to make one for my 2 year old Grandaughter Ava. She loves to colour. I am going to use a hole puncher and punch two holes and thread a ribbon or string through and tie it with a bow.
With love from Oma.
I finally got around to trying this, thanks again! (I used Stitch Witchery to fuse the fabric to the cover, seems to be holding ok)
http://www.stitchcraftcreations.com/2010/03/26/more-than-brilliant-creative-and-imaginative/
How do you round corners with a hole punch, I just end up with lots of little holes, or half holes near the corners of my card ???
Hi there!
Just stopping by to let you know that I linked to this post today on the Scrapbooking blog at Craft Gossip. Everyday I share a variety of wonderful scrapbooking related projects with the vast CG audience. I hope you will not only stop by and subscribe to CG, but will tell your friends about it. Hope you see some traffic from the post!
Your feature will appear in the main Craft Gossip RSS feed, on the main home page and can be found directly here
http://scrapbooking.craftgossip.com/tutorial-cereal-box-journal/2010/08/16/
If you would like a “featured by” button, you can grab one here!
http://craftgossip.com/link-to-us/
I love this idea. We’ve made journals before but not like this!
i made one by hand sewing it. It’s a very nice technique. I’m gonna need more cereal at home!
This is a great inexpensive alternative to those expensive journals that are all the rage these days and you’ll get twice as many looks of approval from the other hipsters. Plus, your doodles and shopping lists will now be complete with 12 essential vitamins and minerals
These journals are great! I hope it’s okay, I just couldn’t help but feature them in a cereal box crafts round-up that I just finished. You can see it here:
http://jamiebrock.hubpages.com/hub/Super-Cute-Cereal-Box-Crafts
Thank you so much for the awesome tutorial 🙂