

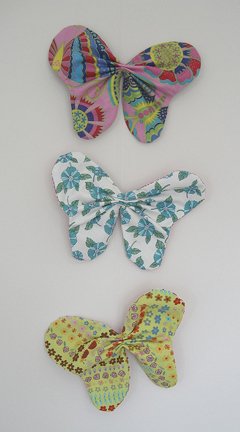
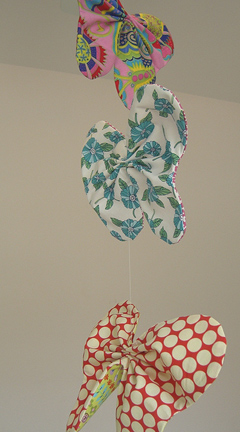
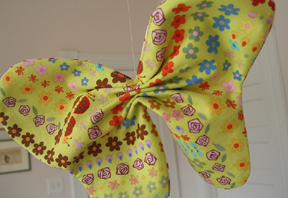
I was inspired by this post about paper butterflies on craftster. The photo on the left is of my mobile hanging on the wall and the one on the right is the mobile hanging from the ceiling. I made each butterfly two-sided with contrasting fabrics. I think it would be sweet in a child’s room or you could use more adult fabrics and hang it in celebration of spring. A smaller version of this butterfly could also be used as an embellishment or could be made as a garland.
Supplies for Three Butterflies:
- Fabric (1/4 yards or remnants of six different fabrics)
- Interfacing, optional (1/2 yard)
- Thread
- Monofilament (fishing line)
- Sewing needle with large eye
Step 1: Cut fabrics and interfacing according to template: butterfly.pdf (48KB)
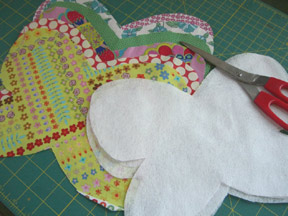
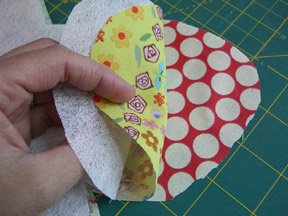
Step 2: Sew fabrics right sides together with interfacing on top (as shown below). Begin sewing about 1 1/2″ from the top center of the butterfly and sew around until you are again 1 1/2″ from the center (this will leave an opening about 3″ wide). Trim excess fabric, particularly around curves, and turn right sides out through opening. Press down corners. Fold under fabric at opening 1/4″ and press down. Sew opening closed. Repeat for other two butterflies.
Step 3: Cut the full length of monofilament (about 4′) and thread through the needle. Take first butterfly and fold accordion-style. Hold in place with one hand. Then insert needle at the center top of the butterfly and pull through (you’ll have to push hard to get it through all layers of fabric) leaving the length at the top of the butterfly that you’ll need to hang it (about 12-18″). Thread monofilament back up through the butterfly and then down again. This should be secure and you will not need to make a knot. Continue to next butterfly leaving a space between them. Repeat. Tie a knot at the end and trim the monofilament, leaving an inch so the knot won’t slip out.
All done! Obviously, if you are going to hang this above a crib, you should hang it securely and well out of the child’s reach. If you make these, please submit a photo to the Make it Monday Flickr group here.
These are just great! What a perfect mobile for a little girl’s room!
i can’t wait for the “details.” i can’t wait to make them for my daughter’s room.
Super cute. I think I need to make one!
Soooo cute! I am going to make these for my little girls! i have plans of pinning a mosquito net up to the ceiling (so it is billowing like clouds) these will look so cute hanging from it!
super cute and great idea!
Very sweet! Thanks.
this is so cute!! I have spent the last bit looking through your blog and I love it! Thank-you for taking the time to post all these tutorials. You are such a blessing!
Great idea!! I love it. I’ve added it to the blog – with a link back here to yours – hope that’s OK.
PS I found your blog a little while back and I love it!!
Hello! We’d love to feature your tutorial… Could you please email me for details? It’s a great project!
beth@sewmamasew.com
Great idea! Thanks so much!!
I love this! This will look so cute in my daughter’s room. I linked to this!
SOOO CUTE! I’m trying to think of a way I can incorporate this into my baby’s Living Room nursery.
This is so charming! It’s also great to have a mobile that’s washable, what with hanging things being dust catchers.
Oh, this is SO CUTE!!! I posted a link on Craft Gossip Sewing Blog: http://sewing.craftgossip.com/tutorial-make-a-mobile-of-fabric-butterflies/2009/05/03/
–Anne
It’s sooo pretty..!!
Really loved to make one..:D
Simple and great..thanks for sharing
Thank you for the tutoorials. You have a great site here. I have great grandbabies coming fun things to make for them.. I do have a question. Is the a way to print the tutorials? I tried but the words don’t print just the photos. Thank you again. Helps so much when your on SS Jude
Perfect! I’m beginning to plan my Liv’s 1st birthday and it’s going to be a butterfly teaparty! This mobile will be beautiful above the cake or I might make garland.
Also your Alice in Wonderland b’day party worked great for my Elle’s 3rd!
Thank you for passing along your lovely ideas!
Deven
homeschooling mommy of Kol, Jul, Elle & Liv
These butterflies are ADORABLE. I just mailed a set to my niece – I made two strings of butterflies and fastened them to the ends of a short piece of dowel rod with fishing swivels. Fabulous mobile; I just know she’s going to love it!!
Thanks for this nice tuto!! I used the idea and it looks really cute!!
thanks, it,s so much inspirable to me,i am going to start a craft studio to help poor little girls and boys to make fun and to earn a little after their scool time, thanks.
Thanks for creating this tutorial, it’s easy to follow and the mobile looks very effective when finished. One thing I would suggest to others is to use the interfacing (possibly fusible if you know how), because my butterflies looked a bit droopy without it 🙂
May I use your pattern,make my own butterflies, and then make my own art (possibly in a shadow box) and then sellj the art? I won’t publish your pattern, but I will credit your website for ginving me the idea-Diane Blevins
adorei a idéia são maravilhosas,sou novapor aqui.
obrigado por compartilhar conosco.
I made the mobile yesterday and it turned out so cute. I added some pipecleaner antennae with buttons at the ends. My friends little girl liked them a lot and my friend even more. Thank you for a great tutorial.
This is so sweet. I was wanting to paint some butterflies in my 2year olds room but these will be so much better.
me encantaron las mariposas pero no se nada en ingles. me encantaria me lo enviaran es español. mil felicidades. espero no perdamos el coctacto. su amiga betty.garcia. venezuela distrito capital 1050
Para Betty el patron de la Mariposa esta arriba butterfly.pdf (Step 1)simplement doble su tela por la mitad coloque el patron en el dobles y cortar dos veses para una mariposas. (step 2)El material blanco no c como c llama pero es para que la mariposa quede plana y firme, coser la oria alreverso pero dejar un espacio para dar vuelta y coser la avertura y plancha. photo (Step 3) Con una aguha coser en el centro pasar hasta abago y regresar arriba y acer nudo para wue no c salgo.
Love this idea I think I will blowup the pattern and make bigger ones. TFS
thanks for this project i am goin to use it for a scene in a tamil movie ,,,
I was so excited when I saw this mobile! I took the pattern and shrunk it into 2 sizes approximately a quarter and another a bit bigger to make several of these for our baby mobile! I’m not a sewer and have enjoyed working on this so much! I sewed the full edge, leaving a slit in the back fabric to turn them for the final step, and stitched the wings horizontally to give them “flight”. I can’t wait to string them and finish the mounting process for the crib! Thank you again for the concept!
Thank you i just made these and have sent a picture to your flicka site!! 🙂 My daughter jsut adores these!!
I can’t seem to be able to get the templates.I wanna make these so bad.
Can’t wait to try this for my great granddaughter, Annabelle.
Used this for a sewing project for teaching my granddaughter to sew.