Vintage Wallpaper

wallpaper.jpg

If you’re looking for some design inspiration, think vintage wallpaper. The pattern of the wallpaper in my grandmother’s kitchen is forever burned in my memory. It was a floral with navy stripes. I’ve never been daring enough to install wallpaper in my own home, but I love the designs. The wallpaper pictured above is from Secondhand Rose in New York and would look great in a little girl’s bathroom. A great site for browsing and inspiration.

notecards.jpg

These note cards from Paperhill Studio available on Etsy are made from vintage wallpaper. Set of 6 note cards for $11.

switch-plate.jpg

I love this switch plate from Fondue Art + Design, also available on Etsy for $20.

lampshade.jpg

Or how about this gorgeous lampshade from When in Doubt Draw Flowers, available here for $250.

Here‘s a list of sources for vintage wallpaper from domino magazine.

Naturally Clean for the New Year

natural-cleaning.jpg

Happy New Year! I will not bore you with all of my New Year’s resolutions, but one of them is to switch completely to natural cleaners. Traditional cleaners give me headaches and sinus problems, so that can’t be good. I already use a lot of baking soda and vinegar, but am still using traditional cleaners for toilets and on rare occasions, bleach for laundry. The natural stuff at the grocery store is so expensive, so I’d really like to try some homemade potions.

I’ve done some experimenting with natural cleaners and here is what I’ve found.

Sinks & Tubs: Baking soda and vinegar work well. I was hesitant to use vinegar because of the smell, but it dissipates quickly. The baking soda works as an abrasive and the vinegar disinfects. I often add some fresh lemon juice and then grind some lemon peels in the disposal. Add some isopropyl alcohol if you don’t trust the disinfectant properties of vinegar.

Toilets: I think a mixture of baking soda and vinegar makes a sufficient cleaner for toilets. But after I tried this, I added a drop of peppermint essential oil and let it sit for a while. I still want things to smell clean. I bought essential oils for the first time and I’m now hooked. The smell of these added to your cleaners is delightful.

Windows: Vinegar. I use undiluted vinegar on a rag. This really leaves a streak-free, clean window and works even better than the blue stuff.

Kitchen Counters: Castile soap, water, and a couple of drops of essential oil in a spray bottle. And you get to read that crazy Dr. Bronner label! This stuff needs to be heavily diluted (like 6 parts water to one part castile soap). Their site says that you can even brush your teeth with this stuff! Yuck.

Laundry: I don’t feel comfortable mixing up my own laundry detergent, but have been intrigued by these Soap Nuts. I’m afraid that they will not work in my washing machine and would love to hear from someone who has tried them.

Floors: For tile and other non-wood floor surfaces, you can mix vinegar, water, and a drop of essential oil for fragrance.

Though many people say that you shouldn’t mop hardwood floors, we have these all over our house and I don’t see how you could get them clean another way. I’ve been using Murphy Oil Soap to clean hardwood floors for years and as far as I can tell, it doesn’t contain anything toxic, but here is a recipe that seems interesting.

Here are some sites that I found helpful:

Treehugger: “How to Green Your Cleaning” – steps you can take to improve indoor air quality and why you should do it.

Clean Green – a comprehensive list of natural cleaners and how/where to use them. There is music on this site.

Earth Easy – another good list of natural cleaners.

The Herbs Placea list of mixes using essential oils.

Doll Quilt

My daughter came to me with an urgent request that I make a quilted blanket for her doll bed as the one she had was LOST! I knew we would find it, but I embrace any opportunity to make a project with her. So she selected her fabric and drew the picture below (of course I somehow managed to spill water on the corner there). She was very specific that the blanket be the exact size of her doll bed and that it have ties at the bottom so it wouldn’t get lost. Wouldn’t that be a good idea for adult beds so you wouldn’t have all those problems with covers wiggling around?

drawing1.jpg

So anyway, I made this for her and I had so much fun with it that I then made some quilted chair covers and am working on another quilted project that I’ll post later this week. I can see how quilting is so addictive, but I don’t think I’ll ever try anything that takes longer than a week to make. Goodness.

cimg3536.jpg

Two-Minute Book Reviews

My mother has always chastised me for not reading directions. This has been a problem with my sewing. I just began using my embroidery machine to sew this year and I seem to learn by trial and error. If I make a mistake, I fix it and usually learn something. When I buy a pattern, I cut out the fabric and try not to follow the directions, which are usually so confusing anyway!

But I got some great books for Christmas that I’d like to share with you. Now in my usual fashion and considering that I am on a sewing roll, I have only skimmed them. But here are my thoughts.

girly-style1.jpg

Girly Style Wardrobe, a Japanese pattern book that I read about on angry chicken. I found the book on e-bay, but it is available here at Lemon Squeezey, along with what looks like some other great Japanese pattern books.

bend-the-rules-sewing.jpg

And since I mentioned her blog, Amy Karol of angry chicken wrote this book that I also received for Christmas: Bend the Rules Sewing. Published in June, the book has a lot of great tips and projects for those new at sewing (and those who, like me, don’t normally read directions). I recommend it.

crafters-companion.jpg

I also received the Crafter’s Companion: tips, tales and patterns from a community of creative minds compiled and with contributions by Anna Torborg of twelve22. This book, also published this year, features seventeen crafters and a project from each. Each person explains her (hmm….all women) esthetic and motivation for creating. A great book for those interested in crafting.

last-minute.jpg

Last, but not least is Last-Minute Patchwork and Quilted Gifts by Joelle Hoverson, owner of purl, a New York fabric store that I would love to visit. This book is full of excellent projects and beautiful photography.

Alice in Wonderland

mushroom1.jpg

Both of my children were born in December. Poor planning. After going through the year of pictures for our 2007 photo album, I realized with sadness and a sense of pride that our older daughter grew up this year. She just turned five and is asking questions like “Does Santa have a job?” and too frequently dismisses things as “just pretend”. She is coming up with her own (and surprisingly funny) jokes and has started wearing blue jeans and a ponytail.

We read Alice’s Adventures in Wonderland over the last few months and decided to have a birthday party with a Wonderland theme. I’ve been looking at the Alice birthday party pictures posted over at Design Mom and thinking what a lovely theme it would be. I’m posting pictures and download-able invitations, party hats and garland.

birthday-girls.jpgtissue-roses.jpg

Of course the girls wanted to dress up as the characters from the book, so I made Alice and Queen of Hearts dresses. I made these giant tissue roses to hang from a chandelier using this method. But I stacked two or more groups of folded tissue paper in an “X” shape before wrapping with the chenille stems, which created fullness for such a large flower. Also, I find that it helps reduce tearing if you fluff the tissue before you wrap it with the stem.

mobile.jpgmushrooms.jpg

I made this mobile with fabric created by iron-on transfer paper. I just cut out the designs and sewed together with an Alice in Wonderland patterned fabric. I then sewed on ribbon and tied each one to an arm of the chandelier. The mushrooms were made with felt, burlap, stuffing and thread spools. I embroidered the dots by machine, made a basting stitch to gather them, stuffed the inside, and hot glued the tops to the base. This was a very last minute project, but one of my favorites.

card-garland.jpg

garland1.jpg

I made two garlands; one with playing cards (jumbo-sized cards would have been better) and one with print-outs of the characters. Here are the images for the cut-out garland: wonderland-cut-out-garland.pdf.

table-runner.jpg roses.jpg

The children sat at a small table and drank tea. I made this runner with fabric that I bought from sonatine over at Etsy. I don’t see it there anymore, but Reprodepot has some great Alice in Wonderland fabric here. For the ribbon flower, I used the pattern at Martha Stewart that you can find here. I served scones and tea sandwiches with cream cheese and orange marmalade cut in the shape of hearts. We used red roses for the centerpiece and made cakes from this rose-shaped pan (in all the frenzy, I neglected to get a photo of the cakes). I decorated the cakes with icing flowers at the base and icing in the rose petals, but it would be lovely with powdered sugar and a rose in the center. Kids do like icing.

We played “Pin the Tail on the Cheshire Cat” with a nice poster board drawing created by my husband (no photo). We sent the kids home with this “Drink Me” hot chocolate mix, shown below. I wanted to do something with “Eat Me”, but the fourteen-year-old in me just couldn’t do it.

favors.jpg

party-hats.jpg

I did not get around to making party hats for the party, but I made some samples and am posting the templates below. You can put them together with glue dots or staples (be sure sharp part is on the outside). You can find thin elastic at the fabric store and staple or securely tape it to the inside.

Here are the party hat templates:

alice-party-hat1.pdf

queen-of-hearts-party-hat1.pdf

white-rabbit-party-hat1.pdf

blank-invitation.jpg

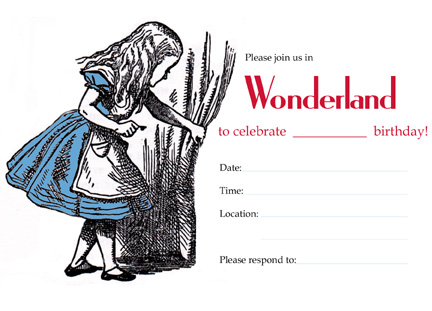
Our invitations were a bit different, but I am posting the basic design as a fill-in invitation (.pdf file below). We printed ours on scallop edged paper, size 4.5″x6.25″(A6 envelopes).

blank-invitation.pdf

wonderland-sticker-page.pdf

And I have also posted a page of characters that you could print on sticker paper, which we used in the pinata. We tried a homemade pinata and it seems that my engineering skills need some work. All of the strings pulled at once! The kids didn’t really mind; they just wanted the candy. So if you want to dress up a store bought pinata (or cover up the princess design), you could glue some tissue flowers on it. Another case of me trying to make something that costs $8.99 to buy.